Mastering VFX Compositing in Foundry Nuke: Best Practices & Workflow Optimization
Introduction
Unlock the full potential of Foundry Nuke with this essential guide to VFX compositing best practices. Whether you’re a professional compositor or an aspiring artist, understanding efficient workflows, script organization, and performance optimization is key to achieving high-quality results while saving time.
A well-structured Nuke script reduces errors, boosts efficiency, and enhances collaboration, ensuring your projects remain scalable and adaptable.
🚀 Want to take your skills further? Stay tuned until the end for details about our comprehensive Nuke Mastery Course, where we tackle real-world complex shots with structured workflows!
Contents
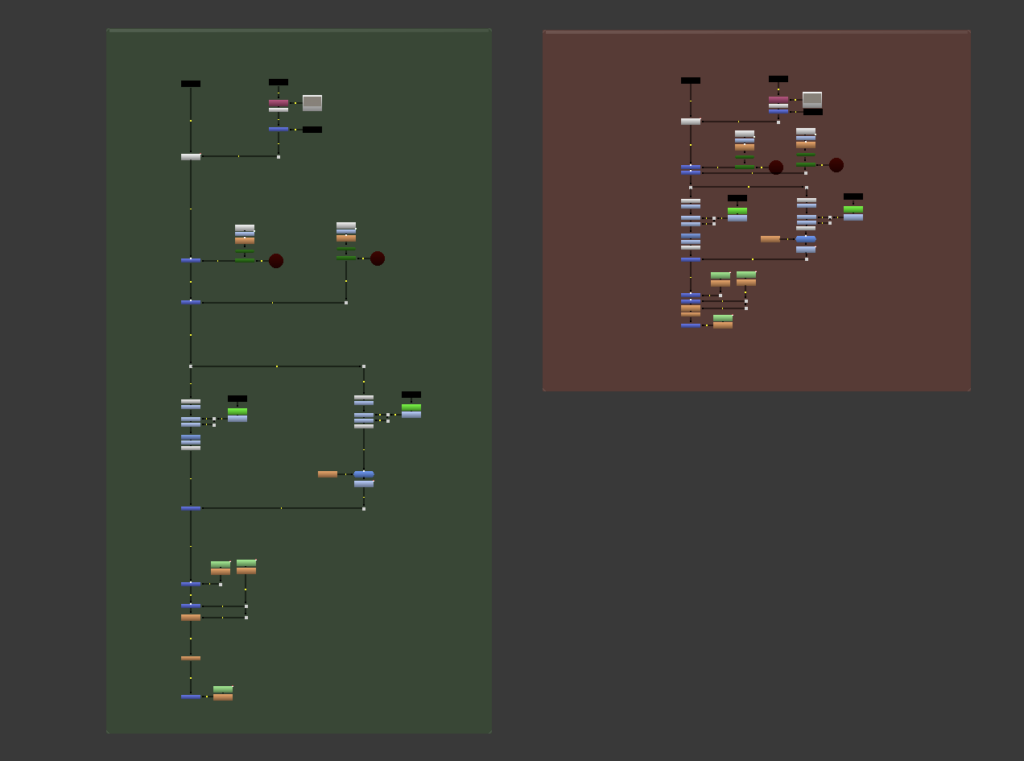
Spread Out Nodes for Clarity: Nuke’s Node Graph provides a wide workspace. Make use of this space by spreading out nodes, organizing different parts of your composition into distinct, clear blocks. This separation enhances clarity and makes your script easier to navigate and understand.
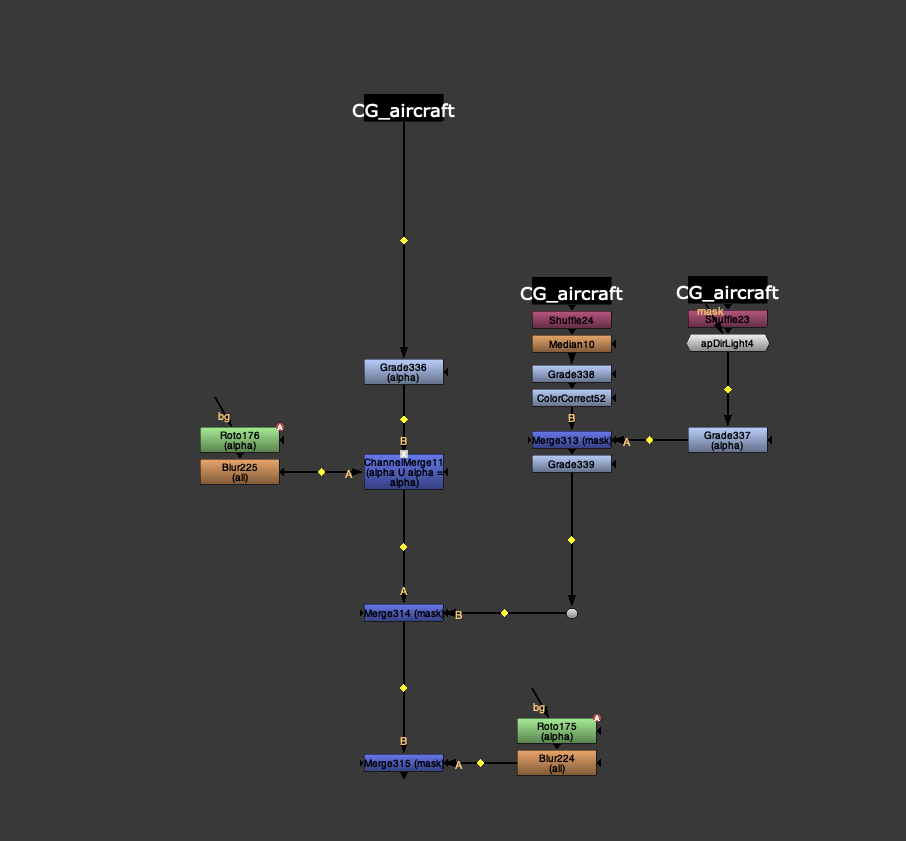
Maintain Clear Piping: Ensure that all layer operations pipe into the B pipe stream (your main branch). This practice allows you to disable merges while still maintaining the image stream flow.
Troubleshooting and Debugging: Clear piping makes it easier to trace the flow of the composition, identify problems, and debug errors. When connections are straightforward and visible, you can quickly locate and fix issues.
Flexibility and Control: By keeping operations piped into the B pipe stream, you can easily enable or disable merges without disrupting the overall image flow. This control allows for more flexibility in adjusting the composition as needed.
Script
Readability and Collaboration: Clear piping enhances the readability of the node graph, making it easier for other team members to understand the composition. This transparency is crucial for effective collaboration and ensures that everyone can work efficiently on the same project.
Efficiency in Workflow: Maintaining an organized and uncluttered node graph streamlines your workflow. It reduces the time spent searching for connections and understanding the structure, allowing you to focus more on creative tasks.
Scalability: As projects grow in complexity, clear piping ensures that your node graph remains manageable. This scalability is important for handling larger and more intricate compositions without getting lost in a tangle of connections.
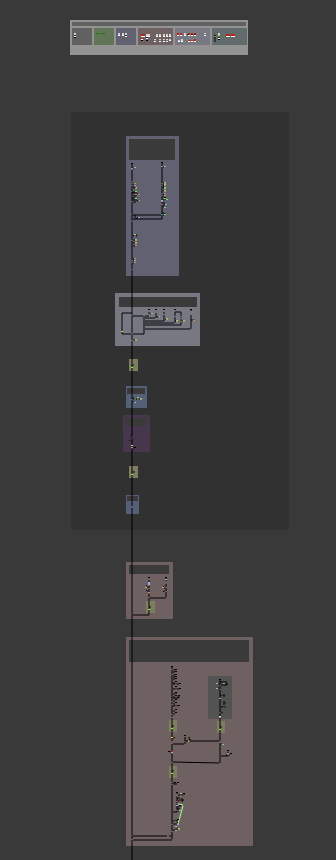
Modular Structure
Keeping your script organized into clear, modular sections helps you work faster and with less confusion. By breaking your work into smaller, self-contained parts, you can quickly find and adjust specific areas without affecting the rest of your composition. This method also makes it easier to understand and improve your work.
Once you practice this modular approach, it will become a natural way to build your compositions. You’ll automatically create scripts that are easier to read and manage.
Benefits of the Modular Workflow
Precompositing: One key advantage of modular workflows is how well they support precompositing. Each module should work as an independent section that can be precomposited. These modules then connect as A-inputs into the main B-spine of your composition.
Clarity and Organization: This method makes your work more logical and simple to follow. An organized script reduces mistakes and saves time, helping you focus on creativity and problem-solving.
Using Python scripts like Scale Tree, Align Nodes, and others to move and organize your nodes automatically can save you a lot of time.
Modular Structure
Keeping your script organized into clear, modular sections helps you work faster and with less confusion. By breaking your work into smaller, self-contained parts, you can quickly find and adjust specific areas without affecting the rest of your composition. This method also makes it easier to understand and improve your work.
Once you practice this modular approach, it will become a natural way to build your compositions. You’ll automatically create scripts that are easier to read and manage.
Benefits of the Modular Workflow
Precompositing: One key advantage of modular workflows is how well they support precompositing. Each module should work as an independent section that can be precomposited. These modules then connect as A-inputs into the main B-spine of your composition.
Clarity and Organization: This method makes your work more logical and simple to follow. An organized script reduces mistakes and saves time, helping you focus on creativity and problem-solving.
Set up your Nuke settings to connect your merge nodes directly to the B input. Preferences > Behaviors > Nodes > "New merge nodes connect A input" = 0
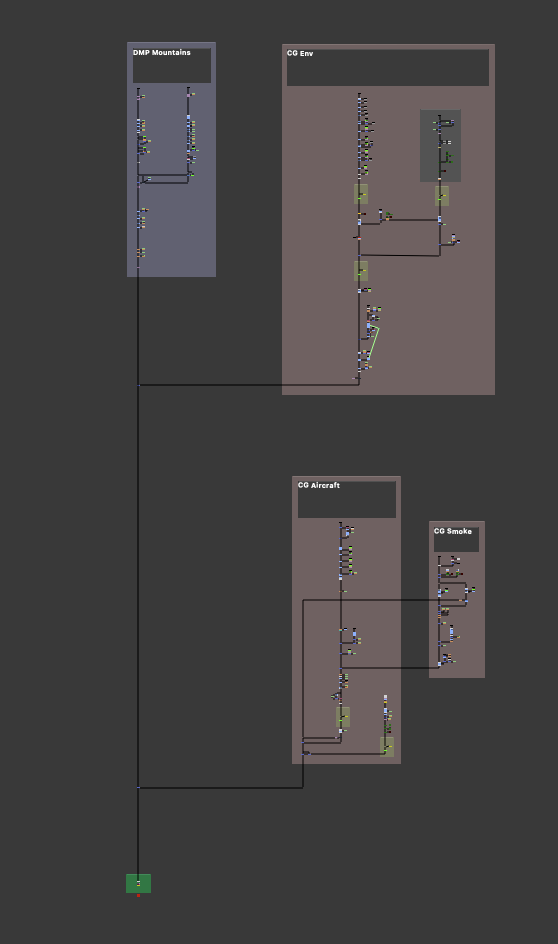
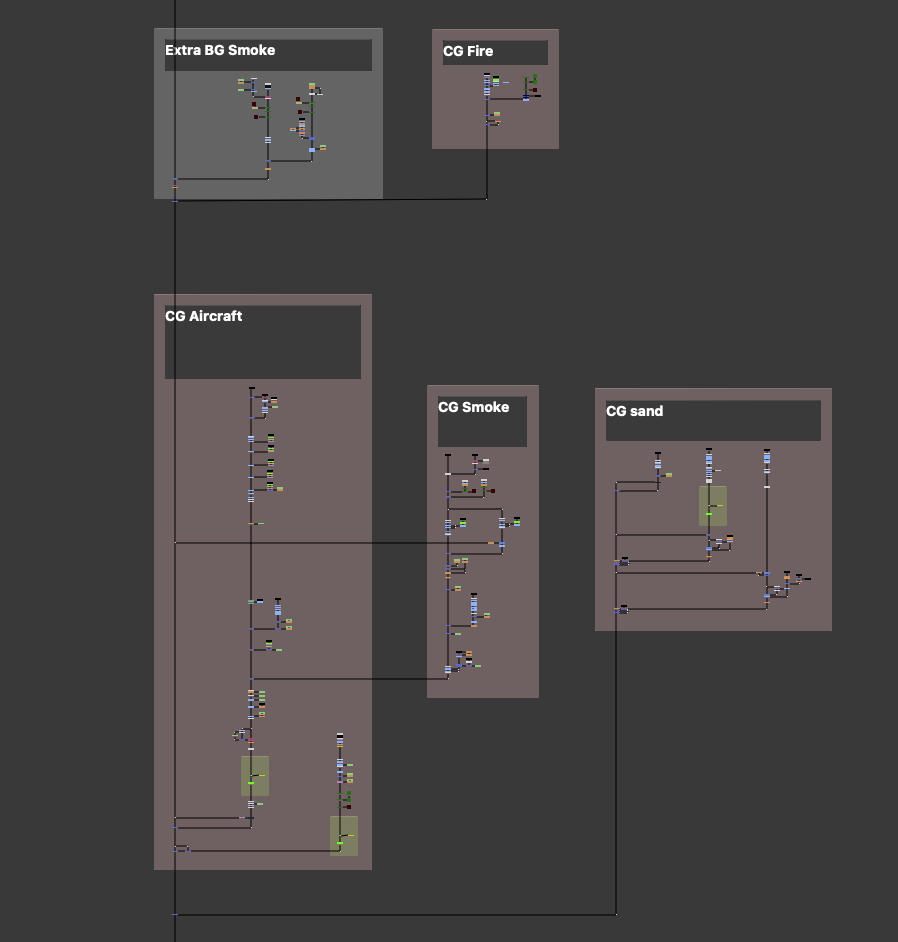
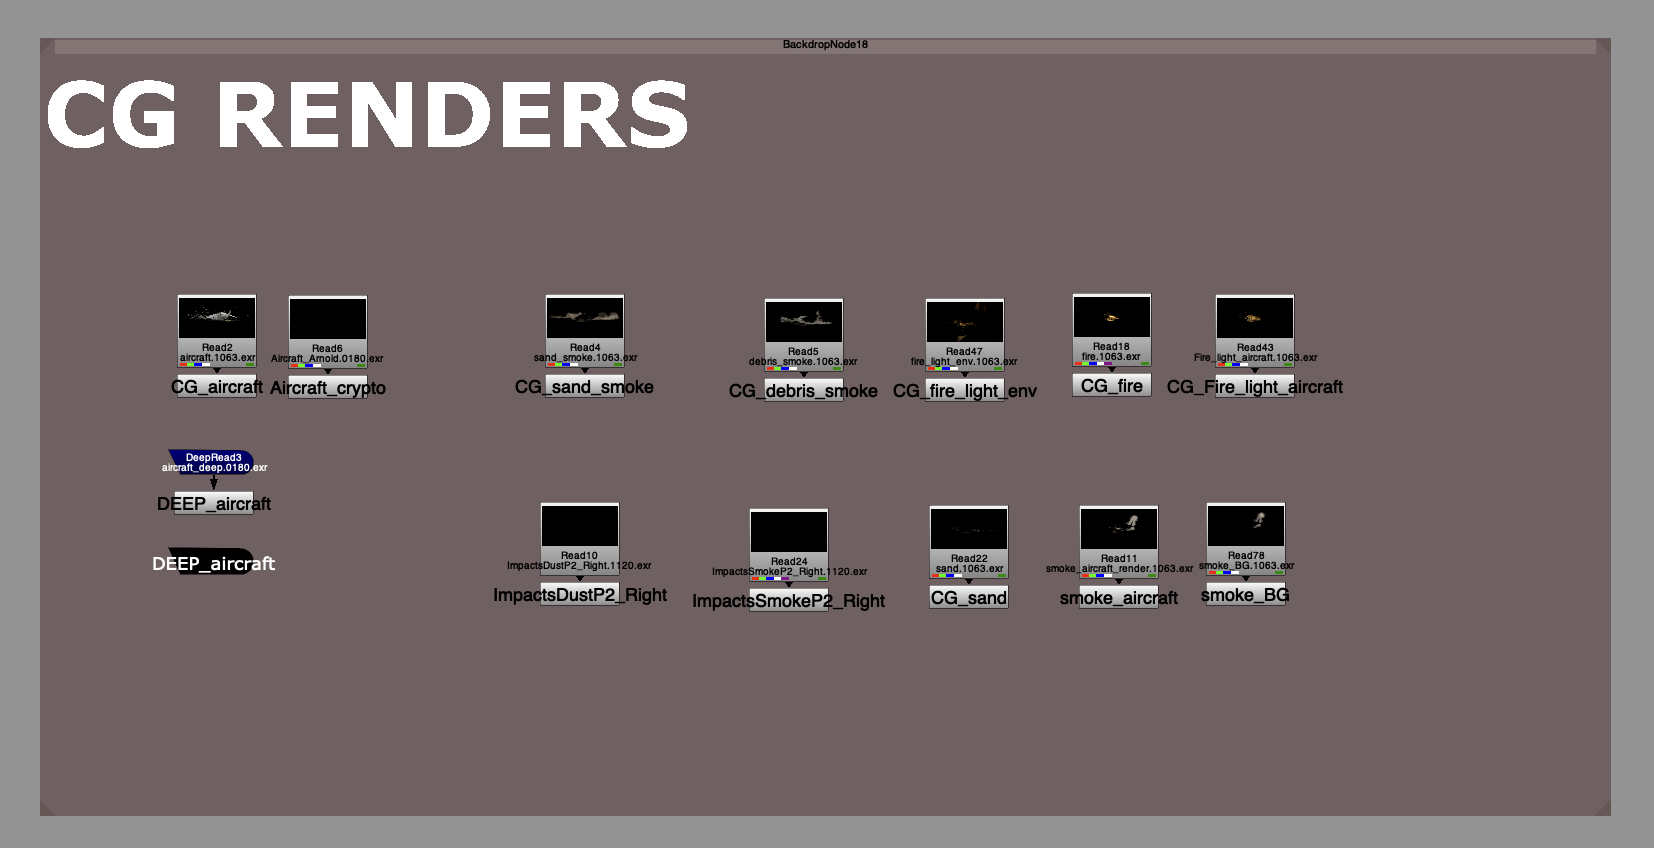
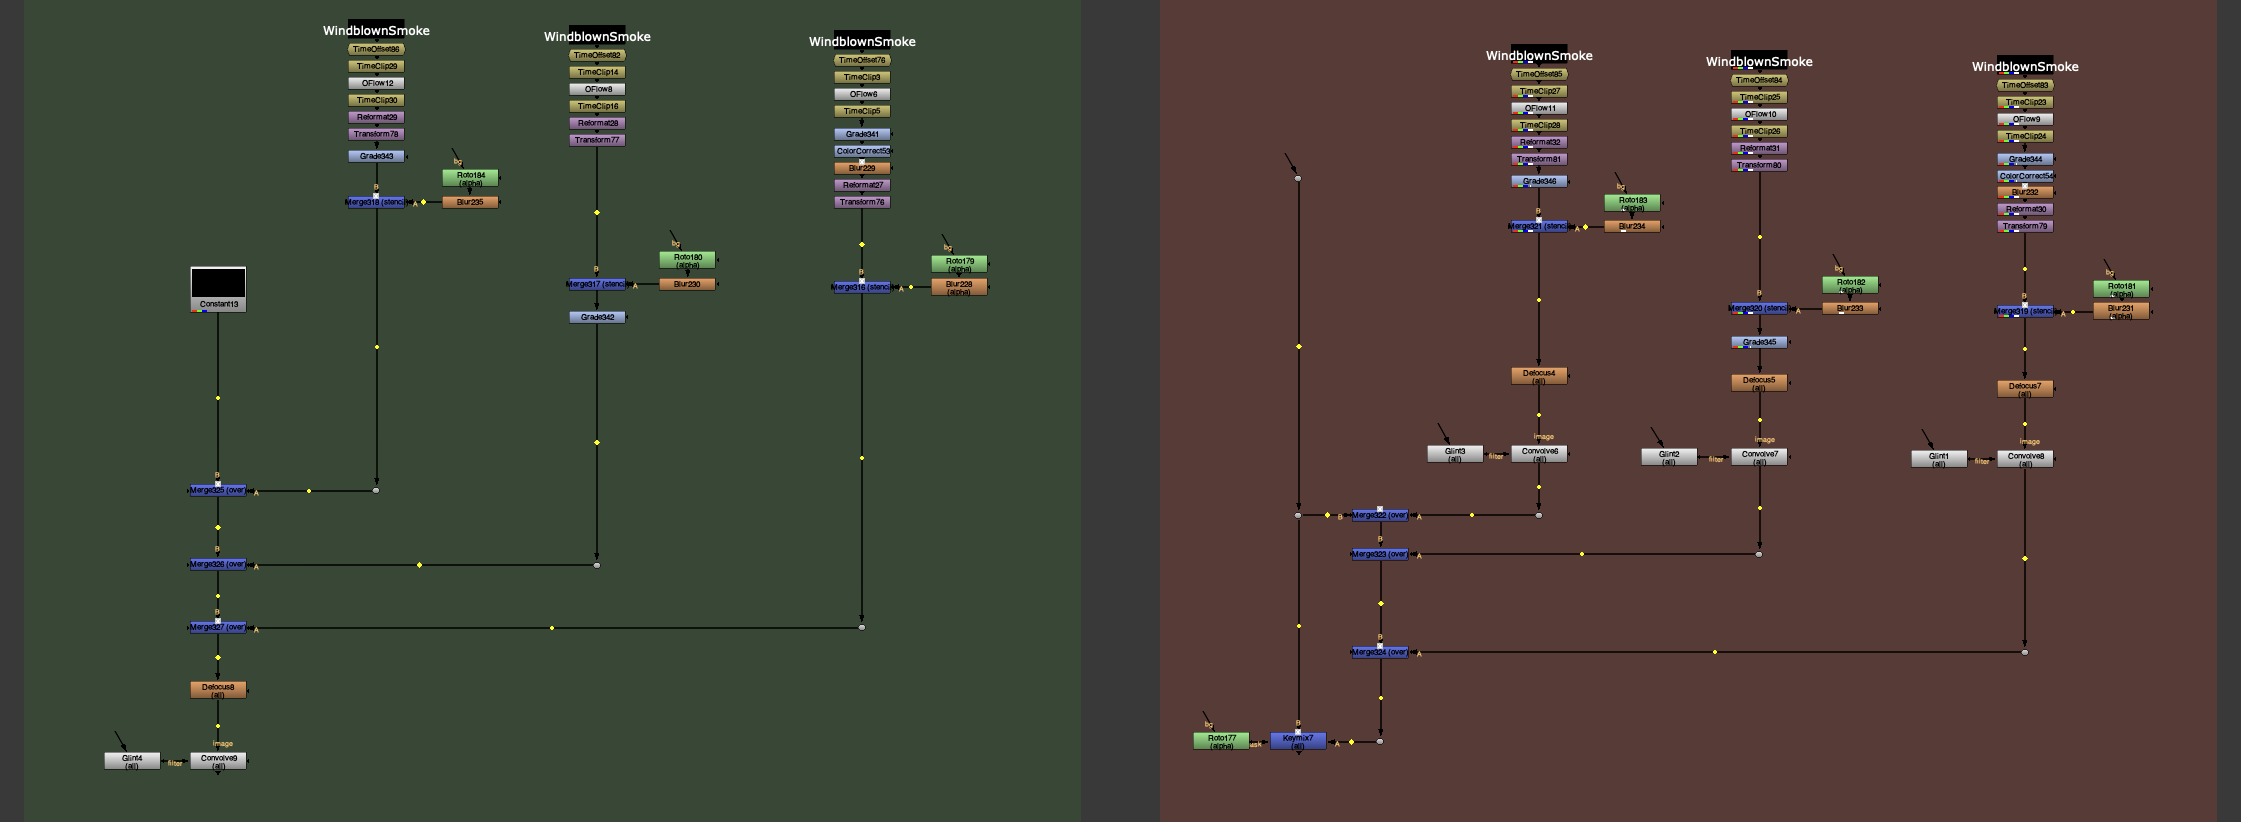
Use Backdrops and Annotations: Utilize backdrops, labeled dots, sticky notes, and annotations generously. These tools help you mark different sections of your script, add explanations, and provide visual cues, making the script more understandable for everyone.
Mask and Stencil Operations: For include/exclude mask operations, get accustomed to using the ‘mask’ and ‘stencil’ nodes instead of older methods like Shake’s ‘inside’ and ‘outside’. This approach keeps your node graph organized and functional
Avoid hidden pipes: Using hidden pipes in Nuke creates confusion and inefficiencies by obscuring node connections, making it difficult to trace the composition flow and troubleshoot issues. This lack of visibility can lead to errors and hinder understanding and maintenance, especially for team collaboration. Clear, visible node connections are essential for optimal workflow efficiency, easy debugging, and maintaining a transparent structure.
Stamps: helps in organizing the node graph by creating visual markers and labels, making it easier to navigate complex compositions.
There is a great debate about whether or not to use stamps tools in your script. In my opinion, it is a very powerful tool to manage the order and clarity of your scripts, which significantly improves efficiency. However, great power comes with great responsibility, and you must use them wisely, ensuring they don’t cause errors.
So, I recommend first following the rules that apply to your project, and from there, with experience, you will be able to assess how much to use them or not.
- By using Stamps, you can reuse the same assets multiple times without duplicating nodes, which simplifies updates and modifications across the project.
- Stamps allow for quick access to commonly used assets and setups, saving time and ensuring consistency throughout the project.
- Using Stamps ensures that all team members have a clear understanding of the project structure and can easily locate and use shared assets, improving collaborative efficiency.
- Stamps make it easy to update or change assets in one place, and those changes propagate throughout the composition, enhancing flexibility and adaptability to changes.
- With centralized and organized asset management through Stamps, the likelihood of errors decreases, ensuring more reliable and accurate compositions.
In conclusion, organizing your Nuke Node Graph with clear piping and a modular structure not only improves the readability and flow of your composition but also enhances efficiency and flexibility in your workflow. This approach helps reduce mistakes, simplifies troubleshooting, and enables smoother collaboration, making it easier to manage complex projects as they grow. By breaking your work into logical, self-contained modules, you create a more scalable and manageable script that allows for quicker adjustments and improvements, ultimately fostering a more creative and productive environment.
All these script examples are taken from the professional compositing techniques course, where we tackle complex shots where order is vital for managing these projects.
Nodes
Single Read Node: Use one Read node for the same file instead of multiple to avoid slowing down Nuke. Reading identical footage multiple times will make the comp heavy as it needs to read all the metadata every time. If there is a need to read the same file multiple times, use stamps to duplicate the file. Nuke needs to read the metadata of each read node in the script.
Node Management: Avoid stacking nodes densely. Instead, focus on adjusting existing nodes for clarity, especially when sharing your work with others.
Combine Similar Operations: Instead of stacking similar nodes (e.g., multiple Blur nodes), combine operations where possible.
Avoid Repeating Processes: Perform similar operations just once to save time and make your script more readable.
Handling Custom Nodes: Ensure that any custom or ‘fancy’ nodes are well-named, labelled, and easy to use. They should not cause major issues or produce unpredictable results.
Format Consistency: Make sure all elements in your script match the project’s format. Use a Reformat node if they don’t, to avoid future problems if something changes. You should apply a format to all the layers you have to avoid problems in the viewer.
Combine Transform Operations: Stack Transform nodes to process them as one operation, which is faster. Geometric transforms should concatenate to retain the integrity of your plates and elements. Multiple transforms can degrade the image integrity, but concatenation combines the mathematics of multiple transforms into one operation, maintaining quality. Keep transforms one after another and avoid placing color correction nodes or merges between them.

If you need to perform multiple transform operations that can't concatenate, use a UV map and a Stamp node to apply your transforms.
Relative Grading Approach:
- Ensure to always use Unpremult/Premult when necessary to maintain the integrity of your compositing.
- Using an Exposure node could be a good practice, the exposure node performs an RGB multiply operation, similar to the Multiply parameter in the Grade node. The key difference is that the Exposure node parameters are set to an exposure scale, which is useful if you’re used to working in stops or printer lights, or if your supervisor/director instructs you to adjust the exposure. There is no special magic; you can achieve the same results using a regular Grade node for color correction.
- Use combined depth passes for grading effects like atmospheric haze across multiple elements, you can do the same with glows, lightwraps or similar lens effects that you only apply once to all the image.
Unpremult/Premult and Log2Lin/Lin2Log are very common operations. You can automate these by using Python to create this "sandwich" around your node and assign it to a shortcut.
Limited Defocus Nodes: Use fewer defocus nodes. Combine depth renders first, then apply defocus.
One-Time Grain Addition: Add grain at the end of your script, not to every element. Don’t add a separate grain node for every element in your composite. This creates unnecessary nodes and slows down your script.
Instead, create a combined grain matte (such as in the B-pipe’s alpha channel). Then, use this matte to regrain all the elements at once with a single grain node.
The DasGrain node is one of the best tools for adding grain in Nuke.
Set up your menu.py file to display changed parameters in the labels of your nodes. This will allow you to see what is happening without opening each node individually.
In conclusion, optimizing your Nuke script involves focusing on efficient node management, reducing redundancy, and ensuring consistency across your composition. By avoiding multiple Read nodes for the same file, combining similar operations, and managing transform nodes effectively, you streamline the process and maintain better performance. Custom nodes should be clearly labeled and easy to use, while format consistency ensures smooth transitions and reduces future complications. Additionally, using combined passes for grading and minimizing defocus and grain nodes improves both the speed and quality of your work. These best practices, along with automating repetitive tasks and displaying changed parameters in your menu, will make your script more efficient, readable, and easier to manage.
Layering
Remove Unnecessary Layers Early: For CG renders with many layers, remove unnecessary layers as soon as possible. For example, keep only essential layers like light groups and normals maps during initial processing, then retain only the minimum required layers after compositing.
Logical Layering: Arrange layers in a logical order, with distant objects at the top and lens effects at the end. This organization makes it easier to understand and navigate the script. Avoid layering in Deep if not necessary; keep the sky at the end of the script for clarity.
Parallel Processing: Split the script into multiple branches that can be processed in parallel. This allows for simultaneous rendering of independent sections of the composition, speeding up the workflow.
Channel Management: Remove unnecessary channels early in the script to keep it clean and efficient. Use Shuffle nodes to manage AOVs effectively.

Apply your effects only to the RGBA channels and avoid using "Channel: All". You can easily set this up in your menu.py file.
In summary, organizing and managing layers effectively is crucial for streamlining your compositing workflow. Start by removing unnecessary layers early, retaining only what’s essential for the final output. Ensure layers are arranged logically, with distant objects at the top and lens effects at the end for clarity. Split your script into parallel branches to speed up rendering and improve efficiency. Additionally, manage channels carefully by removing unneeded ones and using Shuffle nodes for AOVs. Focusing your effects on RGBA channels and avoiding “Channel: All” will further optimize the process, leading to a cleaner, faster script.
Bounding Box Optimization
Optimize Bounding Boxes: Bounding boxes (bbox) define the virtual area calculated by the render engine and are not necessarily the same as the scene’s resolution. Smaller bounding boxes lead to faster CPU calculations, so it’s essential to minimize them.
Analyze Distortion: Analyze how distortions influence out-of-frame pixels and minimize the bounding box size accordingly. Use tools like Crop or OverscanCrop to set appropriate values.
Use the CurveTool node to analyze and auto-crop black regions. Export the AutoCrop data to a Crop node to ensure an optimal bounding box.
Remove Unnecessary Pixels: Ensure bounding boxes don’t grow larger than necessary due to blurs, transforms, or other effects. Use Crop nodes to keep pixel calculations limited to the required area within a shot.
Check fancy gizmos: Examine gizmos for bounding box issues. Convert problematic gizmos to groups to inspect and adjust nodes inside. Place Crop nodes after nodes like exponential glow, blurs, or CameraShake to control the bounding box size.
Use Intelligent Gizmos: Utilize gizmos that manage the bounding box intelligently to avoid unnecessary calculations.
Set up your menu.py for Merge, Copy, and Roto nodes to keep the bounding box from the B input. This allows you to quickly identify where large bounding boxes are coming from.
Copy Bounding Boxes: Apply the bounding box from one node to another without affecting the image data using the CopyBBox node. This ensures that CG renders and other elements maintain an optimal bounding box.
Avoid Over-Cropping: When using lens distortion or CameraShake nodes later in your script, ensure you don’t crop the image too much as these nodes rely on overscan pixels.
Optimizing bounding boxes is key to improving the efficiency of your Nuke compositions. Start by minimizing the bounding box size to reduce CPU calculations, especially by using tools like Crop or OverscanCrop. Analyze distortions and adjust bounding boxes to Ensure they’re only as large as necessary, using nodes like CurveTool and AutoCrop for precise control. Be mindful of bounding box issues in complex gizmos, and use intelligent gizmos or convert them to groups for better management. Additionally, keep bounding boxes in check when using effects like blur or CameraShake and employ the CopyBBox node to transfer bounding boxes efficiently without altering image data. By optimizing bounding boxes throughout your script, you ensure faster render times and cleaner compositions.
Script Sharing and Collaboration
Build Scripts for Universal Readability: When creating scripts, aim for a universal workflow that anyone can understand without difficulty. Avoid using hidden pipes, as they can lead to broken links if part of the script is copied. Also, refrain from using ambiguous nodes or custom nodes that only you can troubleshoot.
Organize Your Work: Use clear backdrops, labels, and annotations to make your script easy to navigate and understand. Proper organization helps others quickly grasp the structure and purpose of your work.
Communicate with Your Team: Share your ideas with the supervision team before distributing your script to the whole team. This ensures that your approach aligns with the overall project and team expectations.
Effective script sharing and collaboration in Nuke depend on creating clear, universally understandable workflows. By avoiding hidden pipes and ambiguous or custom nodes, you ensure that your script remains intact and accessible to others. Organizing your work with clear backdrops, labels, and annotations makes it easier for team members to navigate and understand your script’s structure and purpose. Additionally, open communication with your team, particularly with the supervision team, ensures that your approach aligns with the project’s goals and expectations, fostering smoother collaboration and a more efficient workflow.
Deep Compositing
When to Use Deep Compositing: Deep compositing is a powerful technology that allows for placing elements in depth, offering many possibilities. However, it can be 5 to 10 times slower to render than 2D RGBA compositing. For simpler tasks, such as basic A over B operations, stick to 2D compositing to ensure efficiency. Ensure that holdouts are processed correctly in 2D.
Selective Deep Processing: Use deep compositing only for elements that truly benefit from depth interactions. Develop a decision-making framework to evaluate whether deep compositing is necessary for each element, optimizing your workflow and reducing unnecessary computational load.
Optimize Deep Data Management: Manage deep data efficiently by merging deep data only when needed. This reduces the overall computational load and speeds up the rendering process.
Use Deep Nodes Selectively: Apply deep nodes only to elements that require depth interactions to maintain efficiency.
DeepHoldout for Mattes: Utilize the DeepHoldout node to extract mattes effectively.
DeepCrop to Save Memory: Use the DeepCrop node to reduce the memory footprint of deep images by cropping to only the necessary regions.
Deep Compositing> Use the DeepExpression node to create custom deep mattes for complex holdout operations. Write expressions to isolate specific depth ranges or attributes, such as depth.Z < 100 to create a matte for objects closer than 100 units.
While deep compositing offers powerful capabilities for working with depth-based elements, it should be used selectively to avoid unnecessary computational overhead. For simpler tasks, 2D compositing is more efficient, and deep compositing should be reserved for elements that truly benefit from depth interactions. By managing deep data carefully, merging it only when needed, and using deep nodes selectively, you can optimize your workflow and rendering times. Additionally, utilizing nodes like DeepHoldout and DeepCrop allows for effective matte extraction and memory optimization, ensuring that deep compositing remains a valuable tool without overburdening your system.
In the professional compositing techniques course, we use deep compositing techniques efficiently to create effects that would otherwise be much more complex, while maintaining a smooth workflow that allows us to iterate quickly.
Using Expressions in Nuke
Efficient Use of $gui Expression: The $gui expression in Nuke enables different value processing in the Viewer and on the render farm, boosting the performance of heavy scripts. For example, it allows you to use lightweight nodes in the Viewer while keeping heavier ones for the render farm. It’s also handy for optimizing settings like motion blur samples.
For instance, $gui?1:12 applies 1 sample in the Viewer and 12 on the farm.
Specify Values for Viewer and Farm: Right-click on the knob, choose ‘add expression’, and type the expression in the format:
$gui ? [viewer value] : [farm value]
For example, in the ‘samples’ knob of a Scanline Render node, type $gui?1:15 to use 1 sample in the Viewer and 15 on the farm.
$gui ? 1 : 15
Label Nodes Clearly: When using $gui expressions, label the nodes clearly to indicate their purpose and ensure they are understandable to other artists.
Remove Unneeded Expressions: Remove $gui expressions when they are no longer needed to avoid confusion.
Leave notes explaining the use of $gui expressions in your script. This helps other artists understand the differences between the render and the Viewer outputs.
Better than using the expression $gui directly, you can use a switch node in your script. This will make it much more visible to everyone that you are using this expression instead of using it directly in a knob.
Efficient use of the $gui expression in Nuke enhances performance by allowing different settings for the Viewer and the render farm. By applying lightweight values in the Viewer and heavier settings on the farm, you can optimize heavy scripts, such as adjusting motion blur samples. The expression $gui?1:12 enables 1 sample in the Viewer and 12 on the farm, for example. To ensure clarity, label nodes with $gui expressions and remove unnecessary ones to avoid confusion. Additionally, using a Switch node instead of directly applying the $gui expression improves visibility, making it easier for other artists to understand and work with your script.
Preprocessing
Preprocessing: Process each part of your script in advance as much as possible. This approach speeds up iterations for simple changes and ensures that the final composition is mainly linked to Read nodes for efficiency.
Precomp Sections: Precomp sections of your script that aren’t changing or have been signed off. Even still frames can require significant processing for each frame, so if it’s a held frame or matte painting with additional work in Nuke, pre-render it as a still frame.
On-the-Fly Precomping: You can precomp on the fly while rendering your whole script. Set render orders on Write nodes, ensuring to set the correct frame range.
Interactive Speed: Maintain a script that is speedy and interactive. If your renders change, adjust and re-render only the affected precomp.
Efficient Comping: Process pixels as few times as possible to achieve a great end result with minimal nodes. For complex shots with many Deep renders, use precomps efficiently.
Avoid Unnecessary Precomps: Pre-comping should not be a quick fix but a necessary step to maintain efficiency. Ensure bounding boxes are small, remove unused channels, concatenate nodes, and use heavy process nodes sparingly to prevent the need for unnecessary precomps.
Avoid Daisy-Chaining: Daisy-chaining precomps is inefficient. If a change occurs, you must re-render every subsequent precomp. Instead, plan your work to easily A over B elements, allowing you to precomp the A pipe without affecting downstream elements.
Preprocessing plays a crucial role in optimizing workflow and rendering speed. By precomping sections of a script that are finalized or unchanging, such as still frames or matte paintings, unnecessary processing can be avoided. This approach ensures faster iterations and more efficient composition. When precomping, it’s important to manage render orders carefully and focus on precomping only the necessary parts of a script to maintain interactivity. Efficient comping involves minimizing pixel processing and using precomps strategically for complex shots, without overusing them. Avoiding daisy-chaining precomps ensures that changes can be made without requiring the re-rendering of multiple downstream elements, thus streamlining the process.
Rendering
Preview at Lower Resolutions/Frame Rates: While compositing a shot, it’s not necessary to view all frames at full resolution all the time. Work in proxy modes and render in proxy modes to check progress efficiently. Render full resolution only when submitting or nearing final stages. For early work, render every fifth frame to save time—rendering will be five times faster, allowing you to spot most errors. This method isn’t for continuous use but is effective for quick previews and saving render farm resources. Most flipbook viewers can play back at various frame rates, so even rendering every second frame can significantly speed up your workflow.
Pre-render Heavy Elements: Pre-render elements that don’t change across frames, such as matte paintings or static backgrounds, to save processing time.
Render Locally: Render locally in the background. Modern workstations with ample RAM and multiple processors can handle background rendering via the command line while still allowing for interactive work. This is especially useful for short frame ranges or when the render farm is clogged.
Pre-render particles or heavy RotoPaint nodes in a different script to keep your main script lighter and more responsive.
Pre-render your retimes (TimeOffset, Kronos, OFlow, etc.) to keep your comp lighter and avoid issues with keyframes and time curves.
To optimize compositing workflows in Nuke, it’s beneficial to work with lower resolutions and frame rates during the early stages. Using proxy modes allows for faster previews and more efficient rendering, with full resolution renders reserved for final stages. Additionally, rendering every fifth frame can significantly speed up the process and highlight most errors. Pre-rendering heavy, unchanging elements such as matte paintings, static backgrounds, and particles reduces processing time, keeping the main script lighter. For more complex tasks like retimes or heavy RotoPaint nodes, pre-rendering in separate scripts helps maintain a responsive workspace while still allowing for background rendering on local machines when necessary.
Optimizing Nuke’s User Interface
One of the standout features of Nuke is its customizable interface, which allows you to tailor the workspace to your specific workflow and preferences. Making thoughtful adjustments to the interface can streamline your work and even improve the quality of your compositing. Below are expert tips to help you get started.
Enhancing Node Graph Readability: Coloring Your Pipes
Adjusting the colors of pipes in your Node Graph can make scripts much easier to read and navigate. Here’s how to customize pipe colors:
- Go to Preferences:
- Navigate to Edit → Preferences → Node Graph → Arrow.
- Choose Colors for Pipe Directions:
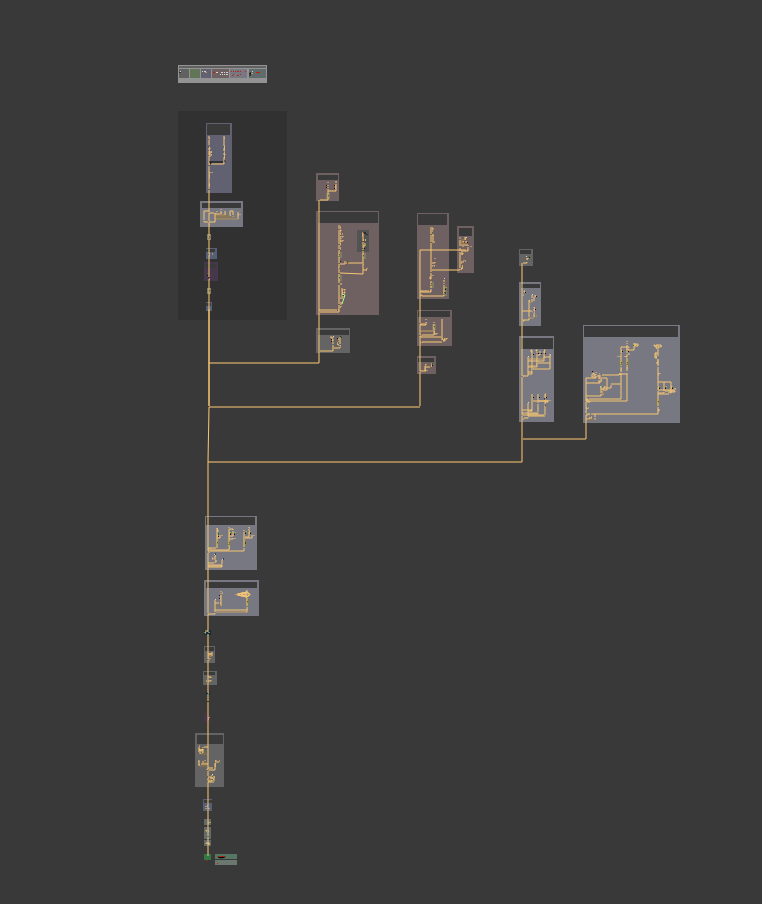
Assign distinct colors for each pipe direction to quickly identify their flow:- Blue for downward pipes: Think of water flowing down a stream.
- Yellow for leftward pipes: Like a sticky note, signaling something to notice (e.g., mask inputs).
- Green for rightward pipes: Represents progress or returning to the main pipe.
Red for upward pipes: A warning to avoid upward flow and maintain an organized downward structure.
Customizing Panel Layouts
Single Screen Setup
If you’re working with a single screen, prioritize the Viewer panel. Make it as large as possible while keeping other panels accessible.
- Avoid stretching the Viewer panel to the full width of the screen, as it wastes horizontal space. Instead, place the Properties panel to the right of the Viewer.
- The Node Graph doesn’t need much space—reduce its size and maximize it with the spacebar when needed.
- Combine the Node Graph, Curve Editor, and Dopesheet into one tabbed panel to save space.
Dual Screen Setup
With two monitors, dedicate one screen entirely to the Viewer panel. This lets you see finer details in your work. Use the second screen for the Node Graph and Properties panel. This setup is particularly useful for tasks like rotoscoping, painting, and working in 3D space.
Saving and Setting Layouts
Save Your Layout:
Once you’ve customized your interface, save it:
- Go to Workspace → Save Workspace, give it a name, and save it for future use.
Set as Default:
Save time by setting your favorite layout as the default startup workspace:
- Edit → Preferences → Startup → Startup Workspace.
Alternatively, in older Nuke versions, overwrite the default “Compositing 1” layout when saving your workspace.
Set the maximum number of open panels to a lower number in the maxPanels field of the Properties panel.
Customizing Nuke’s interface isn’t just about aesthetics—it’s about improving your workflow efficiency and avoiding common frustrations. By tweaking settings like pipe colors, panel layouts, and progress bar placement, you can create a workspace that aligns perfectly with your needs. These small changes add up, creating a smoother and more enjoyable compositing experience. Thoughtful adjustments like color-coding pipes in the Node Graph, optimizing panel layouts for single or dual screen setups, and saving your preferred workspace layouts can greatly improve both efficiency and readability. Simplifying the Properties panel and strategically organizing your workspace reduces confusion and minimizes errors. These small but impactful changes make it easier to navigate complex scripts, allowing you to focus more on the creative aspects of your work and less on workflow frustrations.
Presets and Shortcuts
Workspace and Default Presets: Setting up default presets for ease of use can save valuable time. For instance, you can set your backdrop nodes to a specific font size and your remove nodes to keep RGBA by default. This can be done using Python scripts in your menu.py file located in your hidden .nuke folder. Here’s an example:
					nuke.knobDefault('Merge2.bbox', 'B')
nuke.knobDefault('Keymix.bbox', 'B side')
nuke.knobDefault('Copy.bbox', 'B')
nuke.knobDefault('Roto.cliptype', 'no clip')
nuke.knobDefault('RotoPaint.cliptype', 'no clip')
nuke.knobDefault('ScanlineRender.scanline_order', 'bottom to top')
nuke.knobDefault('Dissolve.which', '.5')
nuke.knobDefault('Remove.operation', 'keep')
nuke.knobDefault('Remove.channels', 'rgba')
Connecting Nodes Efficiently: Use the “Y” hotkey to quickly connect nodes, especially those far apart. Select the first node, shift-click the node you want to connect it to, and hit “Y”. This method also works with nodes that have multiple inputs, like merge and scanline nodes, making the process faster.
Close Properties Panels Quickly: Set a hotkey to close all open properties panels instantly, keeping your workspace clean. Add the following script to your menu.py file:
def close(): [node.hideControlPanel() for node in nuke.allNodes()] nuke.menu('Nodes').addCommand('close', 'close()', 'shift+d')
Customized Shortcuts with Hotbox: Hotbox by Wouter Gilsing is an excellent user interface that allows you to set up customized shortcuts for quick changes to node properties without opening the properties panel. This tool can significantly speed up your workflow once customized to your preferences.
Learn Your Hotkeys: Familiarize yourself with Nuke’s hotkeys to improve efficiency. Beyond basic nodes, learn shortcuts for tasks like switching inputs (Shift+X) or swapping nodes (Ctrl+Shift+drag and drop the new node over the old one, or Ctrl+Shift+X to remove a node from the stream).
Save Scripts as Toolsets: When you develop a useful script segment that you’ll need again, save it as a toolset. This way, you can access it easily in future projects, even if you forget the original composition.
If you often recreate the same setups or think they might be useful later, save them as ToolSets for easy access.
How to Save a ToolSet:
- Select all the nodes in your setup.
- Click the ToolSets menu (wrench icon in the Toolbar) → Create.
- Give your ToolSet a name and click Create.
Your setup will now be saved locally in the \.nuke\ToolSets folder, ready to use anytime.
Saving Node Presets in Nuke
If you frequently use the same non-default settings for a node, save them as a preset to save time.
When to Use Presets:
- For example, you might customize the ScanlineRender node with specific filters, sample values, or layer names for a project.
- Or, you could adjust a ColorMatrix node for particular edge mattes.
Presets are like ToolSets but apply to individual nodes instead of multiple.
How to Save a Preset:
- Open the node’s properties.
- Click the wrench icon → Save as Preset.
Your custom settings will now be saved and ready to use with a single click.
Optimizing your Nuke workflow can be achieved through smart use of default presets, efficient node connections, and hotkeys. Setting up default node properties via Python scripts in the menu.py file streamlines your process, such as pre-setting the bbox for merge nodes or default channels for removing nodes. Hotkeys like the “Y” key for connecting nodes quickly and creating custom scripts for closing property panels can significantly speed up your work. Tools like Hotbox allow for the customization of shortcuts, reducing the need to open properties panels frequently. Additionally, saving often-used setups as ToolSets or node presets enables quick access and reusability across projects, improving overall efficiency.
Hardware-Related
Use Two Hard Drives: Reading footage and rendering to the same hard drive doubles its workload. To boost performance, use a separate drive for rendering. Even a small extra drive can make a noticeable difference.
Invest in SSDs: Solid State Drives (SSDs) provide much faster read and write speeds than traditional Hard Disk Drives (HDDs). Using SSDs for both your system and working drives can greatly reduce load times and improve Nuke’s responsiveness.
Upgrade RAM: Nuke is highly memory-intensive, especially with large compositing projects. Upgrading your RAM helps prevent slowdowns and crashes, ensuring smoother multitasking and better handling of large files.
Use External RAID Arrays: For larger projects, use external RAID arrays for redundancy and faster read/write speeds. RAID 0 or RAID 5 are popular choices for video and compositing work.
Optimize Cache Management: Effective cache management in Nuke accelerates previews and speeds up your workflow. It saves files to disk and reloads them without overusing the CPU or GPU. For optimal performance, set the cache location to the secondary drive mentioned earlier.
Use a Dedicated GPU: A powerful graphics card significantly boosts Nuke’s performance, especially for GPU-accelerated nodes. Make sure your workstation has a dedicated GPU that meets or exceeds Nuke’s recommended specs.
Configure Nuke for Multithreading: Nuke benefits from multiple CPU cores. Make sure your CPU has several cores and that Nuke is set to use them, significantly speeding up rendering and processing.
Optimize Network Storage: In a networked environment, ensure your storage is optimized for high-speed access. Use NAS or SAN solutions with high throughput and low latency.
Regularly Maintain Your System: Maintain smooth system performance by regularly defragmenting HDDs, updating drivers, and cleaning up temporary files. These tasks help prevent bottlenecks and keep everything running optimally.
Monitor System Performance: Use system monitoring tools to track performance. Task Manager (Windows), Activity Monitor (Mac), or top/htop (Linux) can help identify and resolve bottlenecks.
Small Things That Affect Your Performance in Nuke
Card3D vs. 3D Setup with Scanline Render: Card3D renders much faster than regular cards with ScanlineRender, making it ideal for shots with a few cards and no interaction with other 3D objects. It simplifies the setup by replicating the function of a single card in a 3D scene but with improved speed. However, it cannot interact with other objects in Nuke’s 3D space since it is not real geometry.
Blur Instead of Defocus: Blurs require less calculation than defocus due to simpler optics. Use Defocus only for optical ‘bokeh’ effects (blooming highlights). Avoid using Defocus on mattes or to simply soften images when optical effects are unnecessary.
Disable Unnecessary Motion Vectors: The Scanline Render node outputs motion vectors by default, which may not be needed. Turn them off in the “Shader” tab to reduce data processing and speed up your workflow. Adjust render settings to balance quality and performance—use lower settings for previews and higher ones for final renders. Enable depth of field and motion blur only when necessary to optimize efficiency.
Use Vector Blurs for Motion: Choose vector blurs over multisampled blurs. Use MotionBlur2D and MotionBlur3D, which are integrated into the Transform node with standard parameters.
Limit Use of Heavy Nodes: Nodes like Kronos, VectorBlur, and Defocus can be resource-intensive. Use them sparingly and only when necessary. Whenever possible, opt for lighter alternatives like Retimes or basic Blur.
Use Expressions Efficiently: For nodes with parameters that remain constant across frames, avoid using expressions or keyframes. Instead, set static values to minimize computational load.
Minimize Keyframe Animation: Avoid excessive keyframe animation whenever possible. Use expressions for procedural animation when feasible, as they tend to be more efficient.
Efficient Roto and RotoPaint Usage: Avoid using the same RotoPaint node for thousands of strokes; limit each node to a maximum of 500 strokes.
TimeOffset and Retime Nodes:
- Pre-render complex retime operations by baking the results into an image sequence to significantly speed up your workflow.
- Use the Retime node sparingly, and consider frame holds or frame blending for simple time adjustments.
- For general previews, use the “frame method” with OFlow or Kronos.
Channel Output: Control the number of channels written to disk by using the Remove node when the Write node is set to “All.”
3D Scene Size: Large 3D scenes can slow down rendering because geometry building is single-threaded. Ensure that geometry is efficiently generated for each frame.
Identify Node Issues with Performance Timers
If your Nuke script is slowing down, the cause may not be immediately obvious. Nuke performance timers can help.
These timers color-code each node based on their calculation time: green for fast, orange for medium, and red for slow. This allows you to identify bottlenecks in your script and make informed decisions about where and when to pre-comp sections.
How to Use:
- Open a script editor panel in Nuke.
- Enter the following Python command to start performance timers
nuke.startPerformanceTimers()
Your nodes will initially appear grey. As you play through your script, they will be color-coded based on performance speed: green for fast, orange for medium, and red for slow.
To exit performance timers mode, run the following Python command in the script editor:
nuke.stopPerformanceTimers()
“Success is the sum of small efforts, repeated day in and day out.”
– Robert Collier