Mastering Nuke’s CopyCat: ML for Compositing and Visual Effects
Introduction
We’re living in a time where artificial intelligence (AI) is starting to reshape the entire creative industry — and CopyCat, one of Nuke’s most powerful tools, puts that technology directly in your hands. It allows you to train a custom AI model using just a few “before and after” examples — and from that, it learns to replicate your work across an entire shot.
But how on earth does that actually work?
Contents
What Is a ML model, Really?
An ML model isn’t some magical, all-knowing brain. Think of it more like a very fast, very patient student. It doesn’t know anything to begin with — but if you show it enough examples, it can start to guess what it should do next.
Imagine teaching someone what a dog is just by showing them thousands of photos of dogs — no explanations, no rules. Over time, they start to notice patterns. That’s exactly how modern AI works.
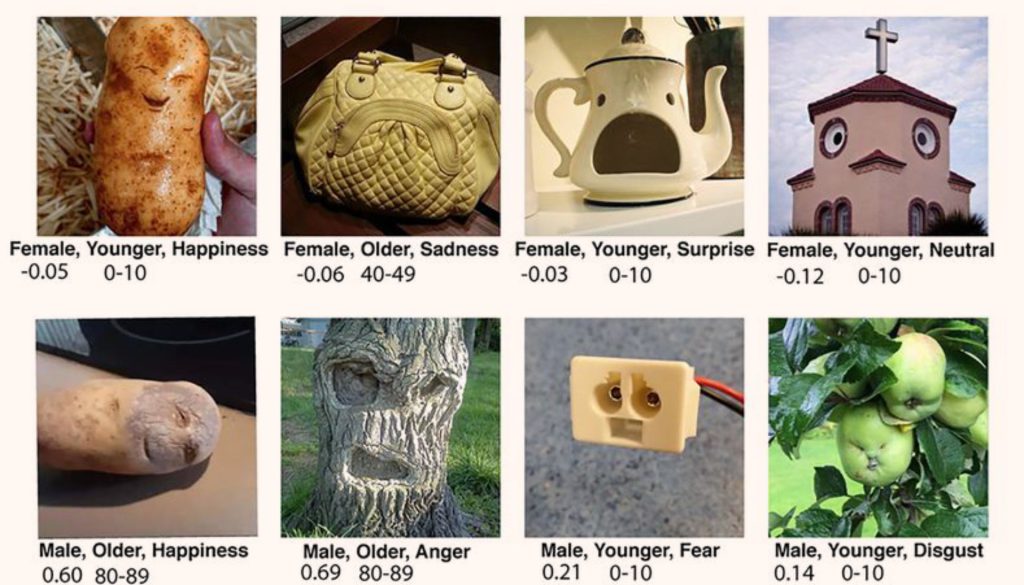
Pareidolia: How Humans (and ML) See Patterns
There’s a psychological phenomenon called pareidolia — it’s what happens when you see shapes or faces in clouds, or think a pile of laundry in the dark looks like a person. It’s your brain looking for meaning in noise.
Modern AIs do something very similar. They don’t understand what they’re seeing — but they’ve been trained on so many examples that they can recognise patterns. They have their own kind of visual pareidolia.
So when you ask an AI to turn your video into a marble statue, or a retro animation, or a dream sequence — it finds what looks like those styles, based on what it’s learned before, and then applies that look to your footage.
What Does CopyCat Do with This?
CopyCat is a machine learning node in Nuke. It uses a process called supervised learning, which means:
You give it pairs of images: one original (the raw plate), and one corrected (your desired result).
CopyCat runs your original through a neural network and compares the result to your corrected version.
It checks how far off it was — and adjusts its internal parameters to get closer.
It repeats this process thousands of times.
Eventually, it learns to apply your transformation consistently — and saves it as a .cat model file.
Once trained, this model can be applied to entire shots using the Inference node.
It’s not just repeating a filter — it’s learning the exact logic behind the visual change you want.
CopyCat Doesn’t Understand — But It Learns Remarkably Well
CopyCat doesn’t know what a face is. It doesn’t understand what a bruise, a shadow, or a wig line means.
But it’s brilliant at imitating visual logic — the kind of patterns that a skilled compositor learns to see instinctively.
It’s like training a junior artist just by giving them lots of before-and-after comps. They don’t need a step-by-step breakdown — they just start to learn by example.
Why Is This Such a Big Deal?
Because CopyCat isn’t just about automation — it’s about teaching a machine to replicate your visual judgement. And once trained, it can:
Rotoscope subjects
Remove objects, scars or tracking markers
Apply stylised looks
Restore motion blur or specular highlights
Generate masks from RGB images
And it can do all this frame-by-frame, with pixel-level consistency — which is a huge time-saver in production.
In Summary
CopyCat is like a visual assistant: it learns from examples you give it.
It works by recognising patterns — not by understanding like a human would.
You train it by feeding in input/output pairs, and it learns the transformation.
Once trained, it can apply that transformation across sequences or shots automatically.
It’s part of a much bigger shift where AI is starting to assist in creative work — not by replacing the artist, but by learning from their choices.
We’re still in the early days — but already, CopyCat gives artists the ability to turn their own creative vision into an automated, repeatable process.
CopyCat: Technical Summary
What CopyCat Is
CopyCat is a node in Nuke — the compositing software used in visual effects (VFX) — that allows artists to train their own neural network directly inside a script. A neural network is a type of machine learning model that learns patterns from examples.
With CopyCat, you can train a model to perform specific tasks by providing it with paired images:
- The Input: your original, unaltered image — often referred to as a raw plate.
- The Ground Truth: the result you want the model to learn — such as a cleaned-up version of the plate, a matte (transparency mask), or an image with enhanced features.
By showing CopyCat examples of “before and after” image pairs, you can teach it to automate similar tasks on other frames in the shot.
Tip: Use CopyCat when you need to automate a repetitive, time-consuming task across many frames — especially when traditional techniques would be too labour-intensive.
Core ML Mechanism
At its core, CopyCat trains a deep neural network by learning how to map input images to desired outputs. This process relies on a mathematical system of trial and error, guided by a loss function — a measurement of how far off the model’s output is from the ground truth.
The training pipeline works as follows:
- Forward Pass
The input image is passed through the model, which tries to generate the correct output. - Loss Computation
The generated output is compared to the ground truth, and a loss score is calculated — the higher the score, the worse the model’s performance. - Backpropagation
The network adjusts its internal weights (the learnable parameters that define how it interprets data) to reduce the loss. - Iteration
This process repeats over many steps, gradually improving the model’s accuracy and generalisation to similar inputs.
Training often starts slow but improves steadily. It’s normal for early outputs to look completely wrong — this is part of the learning process.
Model Behaviour During Training
At the beginning of training (step 0), the neural network is randomly initialised, meaning it has no understanding of the task. As a result, its first outputs will appear meaningless or noisy.
As training continues and the network receives feedback from the loss function, it begins to recognise patterns in the data. The model’s weights are adjusted repeatedly, allowing it to better approximate the transformation from input to ground truth.
Eventually, the model “learns” to mimic the desired output, even on new, unseen frames from the same shot.
Use Cases
CopyCat is well-suited for shot-specific tasks that are difficult or time-consuming to do by hand. These include:
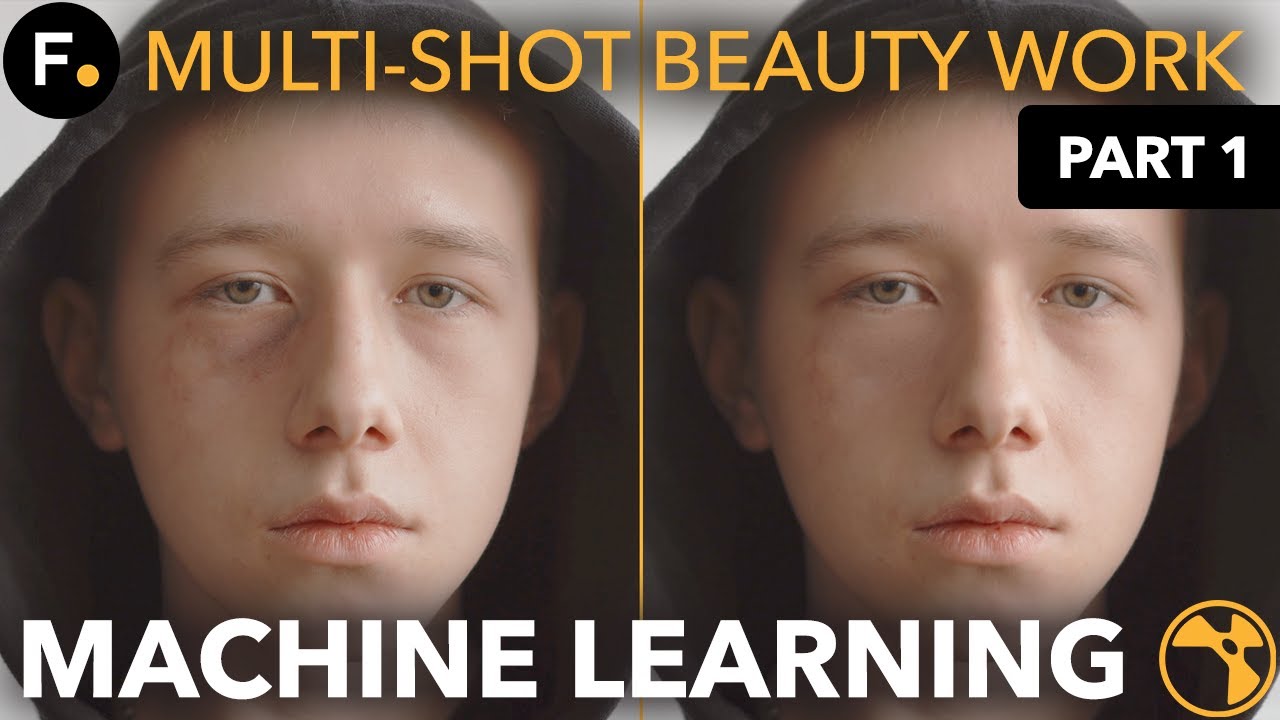
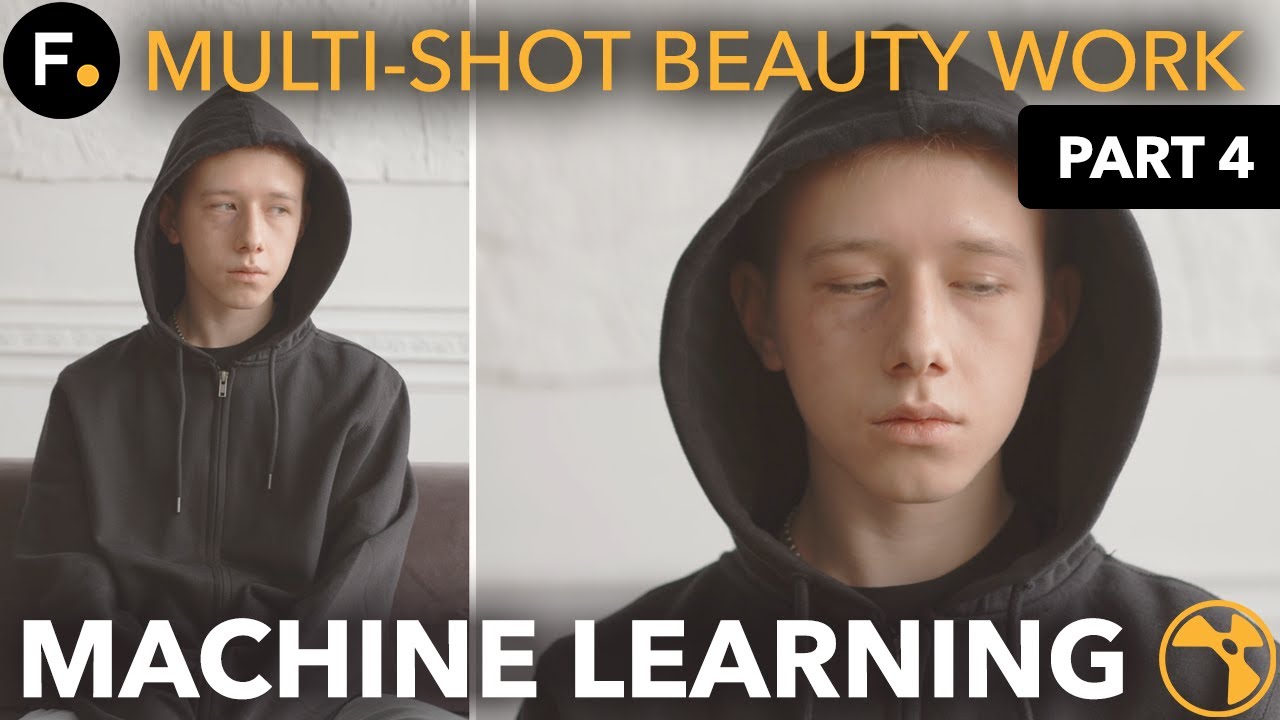
- Beauty Work / Inpainting
For example: automatically removing skin blemishes, small scars, or makeup smudges from actors’ faces. - Marker / Object Removal
Automatically erase tracking markers or unwanted objects from a plate, based on examples of clean replacements. - Garbage Matting / Human Matting
For example: generating alpha mattes (black-and-white masks used to separate a subject from the background) from RGB footage, using labelled examples to guide the network.
You can monitor training progress in the CopyCat UI. A steadily decreasing loss value is a good indicator that the model is learning correctly.
Key Takeaways
To get the most out of CopyCat, keep these principles in mind:
- Use high-quality, perfectly aligned training pairs
Even small misalignments between input and ground truth can confuse the model. - Include diversity in your training set
For example, show the model faces in both light and shadow, or people at different angles — this helps it generalise better across the shot. - Watch the loss value during training
A steadily decreasing loss usually means the model is learning well. If it plateaus or rises, you may need to review your dataset or training settings. - CopyCat is shot-specific
Models trained on one shot typically won’t work well on a different one. Unlike general-purpose AI tools, CopyCat learns from specific examples and excels when applied to similar data.
Think of CopyCat like a custom tool you build for each shot — not a one-size-fits-all solution.
Frame Selection Strategy
Core Insight
When training a CopyCat model, it’s important to understand that it has no built-in understanding of what it’s looking at. It doesn’t recognise people, vehicles, environments, or any kind of objects in a semantic way.
Instead, it learns pixel relationships — for example, how certain colours, textures, or patterns relate to one another within the examples you provide. That means “white next to a skin tone” is a completely different thing to the model than “white next to a red wall,” unless both are included in the training data.
Always think in terms of what pixel patterns the model sees, not what humans interpret.
Frame Selection = Training Data Design
Choosing the right frames is critical to teaching your model how to generalise across an entire shot. Since CopyCat doesn’t “see” meaning, the dataset must be carefully constructed to reflect the visual variety within the shot.
Key Selection Dimensions
When choosing frames for training, cover as much visual variation as possible in these areas:
Motion
- Include frames that represent different phases of movement.
- Camera movement: e.g., pans, dollies, tracking shots.
- Subject or object motion: e.g., walking, turning, waving, spinning.
Illumination Variance
- Choose frames that reflect lighting changes across the sequence.
- Examples: shadows falling across the subject, exposure shifts, or backlit vs front-lit setups.
Focus / Defocus States
- Include both sharp and blurred frames, especially if:
- The shot includes rack focus (shifting focus between foreground and background).
- You’re trying to correct or maintain continuity of focus across cuts.
Lighting conditions can dramatically change how surfaces appear. Make sure your model sees those variations.
For deblurring or stylisation tasks, the model must learn from both extremes of focus.
Best Practices for TDs & Compositors
When working with CopyCat, think of frame selection as being similar to keyframing — you’re marking the critical moments that define the shot’s variation.
Keep these principles in mind:
- ✅ Avoid redundancy: Don’t use multiple frames that are visually identical.
- ✅ Maximise diversity by covering:
- Different scene conditions (light, motion, focus)
- Various spatial locations (centre, corners, edges of frame)
- Changes in subject appearance (pose, angle, costume, makeup)
If a subject rotates or moves drastically, and your dataset only includes one pose, the model is likely to fail when it encounters different positions.
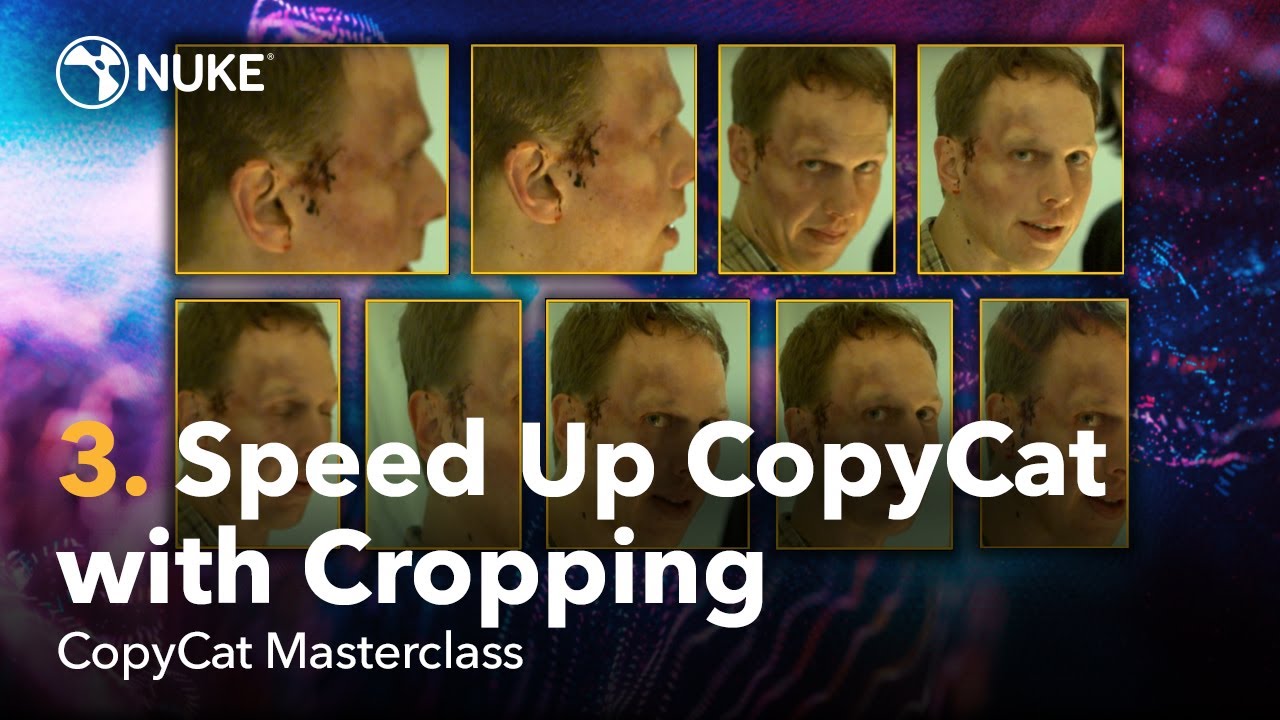
Training Acceleration via Smart Cropping
How CopyCat Trains by Default
Speed up training and improve model accuracy by guiding CopyCat to focus on the regions of interest (ROIs) within your input images — particularly useful when the effect you’re training for is localised to a small area (e.g. a blemish, blood splatter, or facial detail).
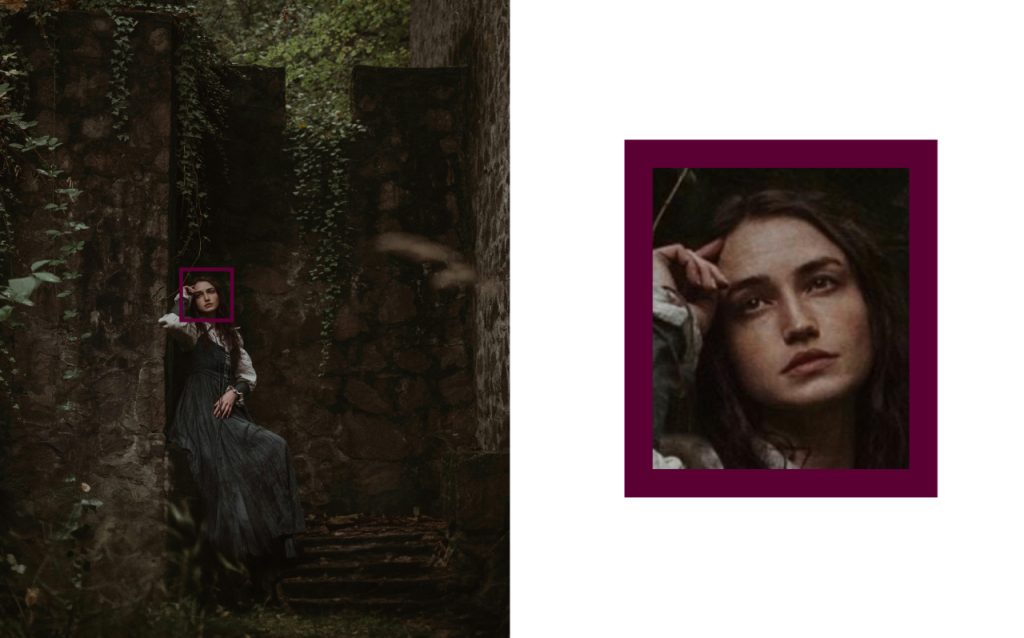
You can significantly reduce training time and improve results by simply cropping your data more strategically.
By default, CopyCat randomly samples crops from your training frames during each training step. This means:
- It doesn’t know what part of the image contains the important detail.
- If your effect is small or localised (like a small bruise on a cheek), most crops will miss the relevant area.
- As a result, many training iterations go to waste — the model spends time looking at areas where nothing changes between input and ground truth.
This slows down learning and makes convergence (the point where the model reliably produces the desired output) much less efficient.
If the effect only exists in a small portion of your image, default training will be very slow unless you intervene..
Solution: Explicit Cropping
You can manually define custom crop areas around the region you want the model to learn — this makes the training far more targeted.
For example:
- Crop around an actor’s face if you’re removing blemishes or makeup.
- Zoom in on a region where blood needs to be cleaned up.
This approach:
- Increases the chance that CopyCat will train on the relevant pixels.
- Leads to faster convergence, because the model sees more meaningful examples in fewer steps.
- Improves the fidelity of the result, especially for small or subtle details.
How to Set It Up
To implement explicit cropping:
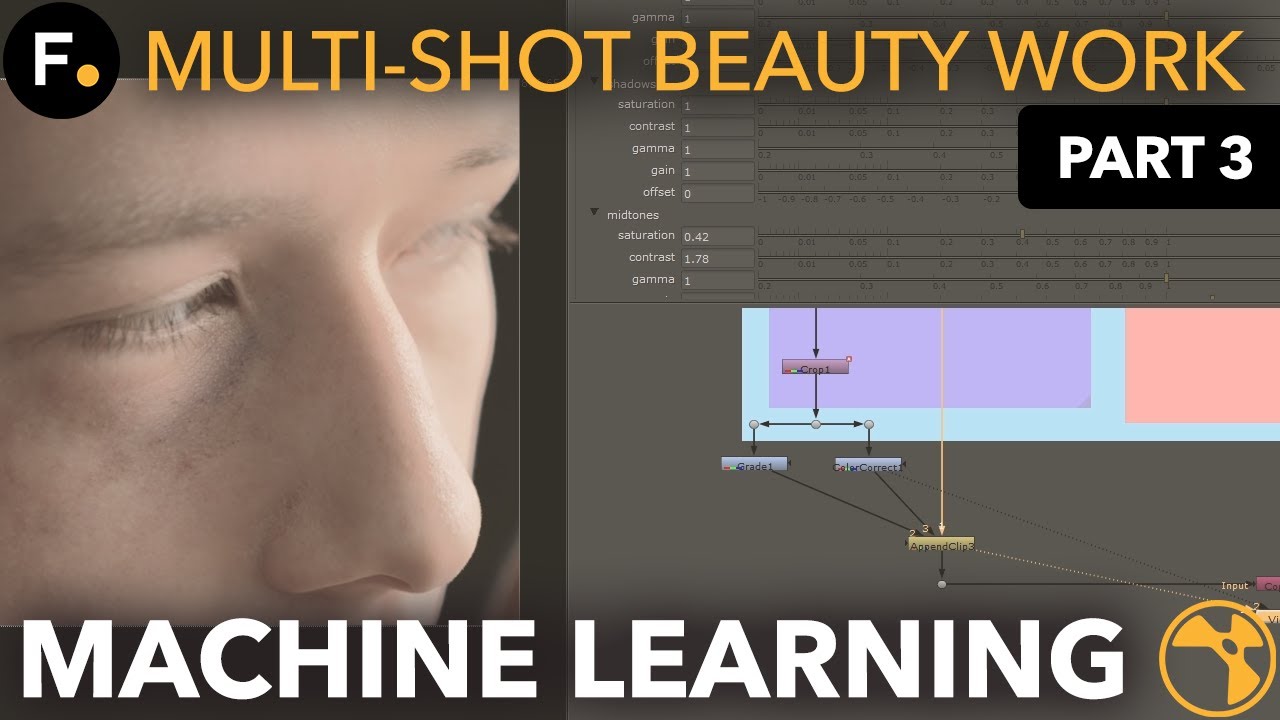
- Use a Crop node to isolate the region of interest.
- Follow it with a Reformat node if needed, to standardise resolution.
- Use AppendClip to build a training sequence of these cropped areas.
You can feed this cropped sequence into CopyCat as your training input.
The AppendClip node allows you to combine cropped regions from multiple frames into a single training clip — extremely useful for small but varied datasets.
Architecture of a Robust Crop-Based Training Set
To make cropping truly effective, combine targeted crops with a few full-frame context frames. This ensures CopyCat learns both what to change and what not to change.
1. Cropped Training Frames
- Focus on the region containing the desired visual effect.
- Ensures that the model repeatedly sees the key transformation — for example:
- From “skin with bruise” to “clean skin”
- From “blood-stained face” to “unmarked face”
- From “skin with bruise” to “clean skin”
This is especially important for learning fine detail, such as skin texture, subtle colour changes, or small artefacts.
2. Full-Frame Context Frames
- Add several full-frame training examples to teach the model the context of the shot.
- Helps prevent overfitting, where the model becomes too focused on crops and starts applying changes to similar-looking areas that should remain untouched.
For example:
- If there’s another actor in the shot with similar features (or blood/makeup that must stay), context frames ensure the model doesn’t modify them by mistake.
Shows CopyCat where not to apply the learned transformation.
Think of it like this — cropped frames teach the “what”, and full frames teach the “where”.
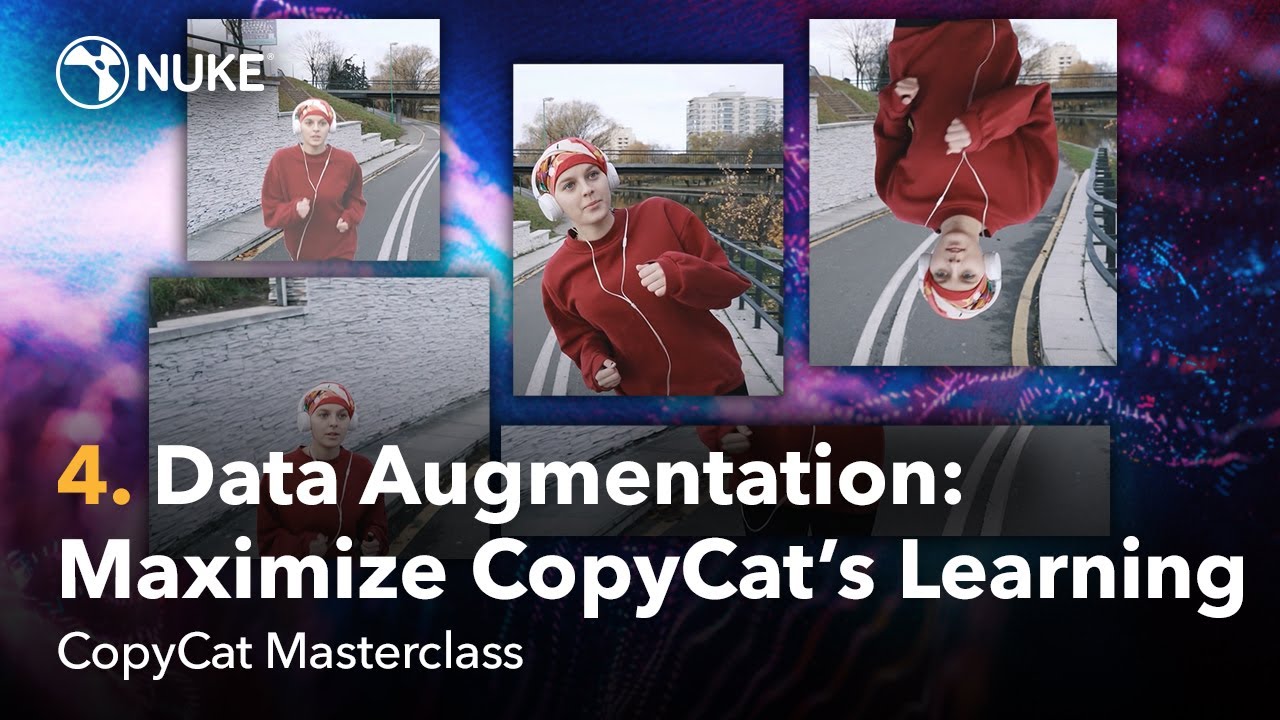
Data Augmentation Techniques
Improve the performance and robustness of your CopyCat models by artificially expanding your training dataset. This is done by creating synthetic variations of your existing frames — no extra rotoscoping or cleanup work required.
Think of data augmentation as a way to “teach” your model more than it saw — without creating more by hand.
What is Data Augmentation in the Nuke CopyCat Context?
In CopyCat, data augmentation refers to automatically modifying your existing input/ground truth image pairs in order to simulate new visual conditions.
This allows you to:
- Increase your dataset size without additional manual effort.
- Help the model generalise better to new frames.
- Address edge cases where CopyCat might otherwise fail.
This is especially powerful when your current dataset is small or lacks variation — a common case in production shots.
Key Augmentation Techniques for VFX Tasks
Here are common augmentation methods used in CopyCat workflows, tailored for visual effects tasks:
1. Flipping (Horizontal / Vertical)
- Mirrors your existing frames.
- Helps with symmetrical features (like faces, bodies, or environments).
- Useful for tasks involving left-right consistency or mirrored motion.
Avoid vertical flips if gravity-related features (e.g., shadows, drips) are important — it could confuse the model.
2. 2D Transforms (Translation, Scaling, Rotation)
- Apply small position shifts, resizes, or rotations to simulate different camera perspectives or subject movement.
- Great for shots with panning, zooms, or varied angles.
Don’t go overboard — extreme rotations or zooms may break alignment between input and ground truth.
3. Colour Corrections
- Simulate exposure shifts, lighting changes, or camera settings.
- Apply variations in:
- Brightness / exposure
- Contrast
- Hue or saturation
- Brightness / exposure
Use subtle, realistic colour shifts to mimic natural lighting variation. Avoid creating colour combinations that wouldn’t exist in the scene.
4. Cropping and Repositioning
- Offset the subject within the frame.
- Mimics camera reframing or subject repositioning.
- Helps the model handle shifts in framing or composition.
Always ensure that the ground truth is cropped and repositioned in sync with the input.
5. Compositing Over Varied Backgrounds
- Particularly valuable when dealing with object edges, such as hair, translucent clothing, or fine detail.
Helps the model learn how to respond when subject boundaries interact with difficult backgrounds — like white-on-white or dark-on-dark.
Real-World Case Study: Human Matting
Train a CopyCat model to generate alpha mattes (transparency masks) for a runner moving through a variety of real-world environments.
Issue
The model failed on frames where the runner’s white headphones overlapped with the white sky. There was not enough training data to help it distinguish the boundary.
Solution
Instead of redoing manual Roto, the team used data augmentation:
- Took an existing clean Roto frame of the runner.
- Composited the runner over different sky backgrounds — including those with intentional white-on-white overlap.
- Animated the position of the runner to simulate new motion and placements.
- Applied colour and lighting changes to match diverse outdoor environments.
All new training pairs were derived entirely from synthetic variants of existing annotated frames.
Use augmentation to create your own “stress tests” — deliberately target the model’s weak points.
Why This Matters
Unlike some general-purpose AI tools, CopyCat has no built-in knowledge of the world. It doesn’t understand what a person or headphone is. It only knows how to respond to patterns it has seen in your data.
That means:
- A limited or repetitive dataset will cause the model to fail on unfamiliar conditions.
More diversity = better generalisation = fewer artifacts and errors during production use.
Technical Best Practices
Follow these guidelines when applying augmentation:
- Augment with purpose: Think about what visual changes you’re simulating — lighting, perspective, subject movement, or context.
- Maintain alignment: Ensure that your augmented input still matches the ground truth exactly. If you’re compositing or transforming, apply the same changes to both.
- Inspect results carefully: Always check your augmented frames, especially at problem areas like hair edges, shadows, or transparent regions.
A well-augmented dataset not only reduces manual prep work — it directly leads to lower loss values, faster convergence, and more production-ready results. CopyCat is highly sensitive to mismatched data — always quality-check before training.
Keep a reusable “augmentation toolkit” in your Nuke script — so you can apply and tweak these techniques quickly for different shots.
Dataset Size Best Practices
Learn how the size and scope of your dataset directly affects CopyCat’s performance — whether you’re training a model for a single shot or developing a broader tool for reuse across projects.
A bigger dataset isn’t always better — it depends on whether you’re solving a specific or general task.
Core Concepts
CopyCat supports two main training strategies, and each one has very different data requirements.
1. Shot-Specific Training (Localised Learning)
This is the most common use of CopyCat: building a model tailored to one specific shot.
- The model is trained to replicate a transformation unique to that sequence.
- Examples: removing blemishes, cleaning up tracking markers, generating mattes.
- Examples: removing blemishes, cleaning up tracking markers, generating mattes.
- Because the context is tightly controlled, you only need to teach the model about the variations within that shot.
Recommended Dataset Size: 1–30 image pairs
You don’t need a large dataset — just one that covers the full range of visual change in the shot. Choose training frames that represent:
- Camera or subject motion
(e.g. a head turning, the actor walking across frame) - Lighting shifts
(e.g. exposure changes, moving shadows, backlighting) - Focus or depth-of-field changes
(e.g. rack focus, defocus moments)
You’ll usually get excellent results from just 5–30 frames, as long as those frames are well chosen.
2. Generalised Training (Broad Domain Learning)
This approach is used when building a reusable CopyCat model — one that can be deployed across many shots or even different shows.
- The model needs to handle diverse inputs and produce consistent outputs in changing conditions.
- Examples: human matte extraction, image upscaling, motion deblur.
- Examples: human matte extraction, image upscaling, motion deblur.
Required Dataset Size: 10,000–1,000,000+ image pairs
To generalise well, the model needs to see a huge variety of:
- Subjects
- Backgrounds
- Lighting setups
- Motion types
- Edge cases and noise
Real-World Example:
The Foundry’s in-house Human Matting model was trained on around 10,000 annotated examples — a strong baseline for general-purpose tools.
For generalised tasks, aim for 10,000–20,000 image pairs to start. Add more over time as you expand the use case.
Implications for Production Pipelines
Here’s how dataset size relates to typical production goals:
Use Case | Recommended Dataset Size | Purpose |
Shot-specific cleanup (e.g. bruise removal) | 5–30 frames | Fast turnaround, targeted accuracy |
Custom stylisation on one clip | 10–25 frames | One-off creative look, quick iteration |
General human matte extraction tool | 10k–100k+ frames | Consistent performance across multiple sequences |
Deblur or upscaling across different shots | 50k–1M+ frames | Long-term deployment as a studio tool |
Keep scope in mind — don’t overshoot. You don’t need thousands of frames to solve a single shot.
Technical Best Practices
For shot-specific training:
- Prioritise frame diversity over raw quantity.
- Spend time carefully selecting keyframes that represent all meaningful change in the shot.
- You can accelerate learning with techniques like smart cropping and data augmentation (see Parts 3 & 4).
For generalised models:
- Build a large, varied dataset with wide domain coverage.
- Ensure all data is correctly labelled and aligned.
- Use CopyCat’s pretrained models (e.g. Deblur, HumanMattingLarge) as starting points — you can fine-tune from these rather than training from scratch.
CopyCat models can inherit learning from existing networks — speeding up training for large-scale tools.
Summary
CopyCat’s data needs scale with the scope of the task:
- Small, well-curated sets (under 30 frames) are ideal for quick, shot-specific tasks — with fast convergence and high-quality results.
- Large datasets (10k+ frames) are essential when developing reusable tools that must perform across different footage types and production environments.
When in doubt, start small. You can always expand your dataset if the model underperforms on certain edge cases.
Training Pitfalls & Precision Practices
Ensure consistent, high-quality results by avoiding common mistakes that can undermine CopyCat training performance — especially in complex or high-volume Nuke production environments.
Most CopyCat issues aren’t about the model — they’re about the data going in. Clean data = better results.
Common Mistakes & Their Technical Fixes
Below are the most frequent causes of degraded CopyCat output, along with how to resolve or avoid them.
1. Super-White Values / Out-of-Range Input
Problem:
CopyCat’s underlying machine learning model expects pixel values in the normalised floating-point range [0.0 – 1.0].
- Values above 1.0 (e.g. 5.0, 10.0 — common in VFX for hot highlights or HDR plates) cause the model’s internal maths to become unstable.
- This can corrupt training gradients and slow down or completely block convergence.
Fixes:
If the super-white pixels aren’t part of the effect you’re training (e.g. irrelevant highlights):
- ➤ Use a Clamp node before training to restrict input and ground truth to 0–1.
- ➤ After inference, reintegrate the original super-whites back into your final composite using masks — so the model learns only what it needs to.
If the model does need to learn from high values (e.g. fire, lens flares, HDR glows):
- ➤ Convert both input and ground truth images to a logarithmic colour space (e.g. LogC) before training. Log curves compress large values, keeping them in range.
⚠️ Note: Log colour space can slow training slightly due to value compression — expect more iterations to reach convergence.
2. Colour Space Mismatch
Problem:
If your training data is in one colour space (e.g. Rec.709) and inference happens in another (e.g. ACEScg), the model will underperform or fail entirely. This is known as domain shift.
- What looks like a small colour difference to the eye may be a massive divergence in machine learning space.
Fix:
- ➤ Always train and run inference in the same colour space.
- ➤ Use Nuke’s OCIOColorSpace or Colorspace nodes to explicitly manage conversions.
- ➤ Bake colour conversions into your CopyCat precomp, rather than relying on viewer LUTs.
Stick to a known working colour space for ML tasks — Rec.709 or ACEScg are both valid, as long as you’re consistent.
3. Extraneous Channels in Training
Problem:
If you accidentally include extra channels — like alpha, depth, motion vectors, or even metadata layers — the model will treat them as part of the input signal.
- This bloats the input tensor, slows down training, and introduces noise.
- The model may even start learning from irrelevant data (e.g. a depth map shadow).
Fix:
- ➤ Use a Remove node or Shuffle node to isolate only the channels you want:
- Usually RGB or RGBA depending on task.
- Usually RGB or RGBA depending on task.
- ➤ Double-check the channels listed in the CopyCat node before pressing Train.
A clean input = a smarter model. Noise in your channels = confusion in your output.
Summary: Training Integrity Checklist
Here’s a quick guide to check your dataset before starting training:
Issue | What to Check | Recommended Action |
Pixel Value Range | Any values over 1.0? | Clamp or convert to Log colour space |
Colour Space | Training vs inference matched? | Standardise with OCIOColorSpace / Colorspace nodes |
Channel Structure | Extra channels (Z, motion, etc)? | Remove or shuffle to keep only RGB or RGBA |
Create a reusable “CopyCat precomp” template in your team’s Nuke pipeline to enforce consistency.
Pro Tip: Build a Clean Precomp Script
To avoid repeated errors and simplify team workflows, your training setup should always include:
- ✅ Colour space conversion (to match inference)
- ✅ Channel pruning (Remove or Shuffle to isolate RGB/A)
- ✅ Clamp (if needed) to fix out-of-range pixels
- ✅ Clear labelling of input vs. ground truth streams
This approach ensures that CopyCat receives clean, consistent, and predictable data — crucial for stable training, especially in multi-shot pipelines or across larger teams.
Label your training branches in the node graph (e.g. “Input to CopyCat” / “Ground Truth to CopyCat”) — makes reviews and debugging easier.
Model Size – Balancing Performance and Learning Capacity
Learn how to choose the optimal CopyCat model size — Small, Medium, or Large — based on your task’s complexity, training data scale, and the balance between speed and quality.
Tip: Picking the right model size early can save hours of render time — or avoid underfitting entirely
Core Concept
Each CopyCat model size reflects a different neural network architecture — with varying depth, parameter count, and computational requirements.
Here’s a breakdown:
Model Size | Training Speed | Inference Speed | Learning Capacity | Best For |
Small | ⚡ Fast | ⚡ Fast | 🧠 Low | Simple pixel-based tasks (e.g. deblur, upscale) |
Medium | ⚖️ Balanced | ⚖️ Balanced | 🧠 Moderate | Beauty, marker removal, single-shot matting |
Large | 🐢 Slower | 🐢 Slower | 🧠 High | Semantic tasks, generalised models, stylisation |
Model size affects memory usage and GPU load. If you’re training on a lower-spec machine, start with Small and evaluate.
Technical Considerations for Choosing Model Size
1. Training & Inference Time
- Small: Trains and renders quickly — ideal for fast iteration or tight deadlines.
- Large: Slower to train and run, but produces higher fidelity results, especially in complex tasks.
Large models may require longer per-step training time — factor this into your delivery schedule.
2. Task Complexity
Choose the model size based on the type of visual transformation you’re trying to learn:
Task Type | Recommended Model Size |
Basic image-to-image tasks (deblur, clean-up) | Small |
Beauty work, marker removal, inpainting | Medium |
Garbage matting, multi-subject segmentation | Large |
Stylisation or abstract visual transformations | Large |
Tasks involving semantic understanding — like identifying people, hair, or objects — benefit from the Large model’s deeper learning structure.
1. Dataset Size
The amount of training data also affects which model will perform best:
Dataset Size | Model Size Guidance |
1–30 frames | Small or Medium (faster convergence, less overfitting) |
100–1,000+ frames | Medium or Large (allows better pattern learning) |
10,000+ frames | Large (can fully utilise diversity and avoid collapse) |
Using a Large model on a very small dataset may lead to overfitting — unless you're augmenting or fine-tuning from pretrained weights.
Strategic Recommendations
Here’s a quick guide for real-world scenarios:
Scenario | Recommended Model Size |
Quick, single-shot cleanup (e.g. blemish removal) | Small |
Shot-specific stylisation or roto/matting | Medium |
Multi-shot training, generalised matte generation | Large |
Training complex FX tools (e.g. dynamic segmentation) | Large |
For high-end production outputs, larger models often outperform smaller ones — even on modest datasets — but you'll need to accept longer training and render times.
Model size directly affects:
- Learning capacity (how complex a task the model can understand)
- Parameter count (which impacts GPU usage and memory load)
- Output quality and generalisation
While Small and Medium models are excellent for speed and iteration, you’ll often get cleaner, more reliable results from the Large model — especially on nuanced, artistic, or multi-subject tasks.
If render time isn’t critical, always test with Large before committing to final output — especially for client-facing work.
Pre-Trained Weights – Accelerate Training Efficiency
Learn how to accelerate CopyCat training by leveraging pre-trained weights — allowing you to reduce training time significantly while improving early convergence, model quality, and consistency across shots.
Starting from a solid foundation saves time and boosts results, especially in high-pressure production environments.
Core Concept
By default, CopyCat starts with randomised model weights — this means the model knows nothing about your task and must learn everything from scratch. This “cold start” can take thousands of steps to show useful results.
However, CopyCat supports pre-trained model checkpoints, which provide a domain-specific starting point. These models already contain knowledge of common visual patterns (like faces, edges, or motion blur), enabling the model to learn your specific task much faster.
Think of pre-trained weights as a head start — instead of learning how to see, your model can jump straight to learning what to do
Built-In Pretrained Weights in CopyCat
CopyCat includes several built-in model weights that are production-safe and trained on large, diverse datasets. Each one is suited to a different kind of task:
Model Name | Domain Expertise | Best Used For |
Deblur | High-frequency detail reconstruction | Deblurring, inpainting, temporal artefact repair |
Upscale | Resolution and detail enhancement | Super-resolution, scale-sensitive FX |
HumanMatte | Human structure, contours, pose-aware | Garbage matting, beauty cleanup, roto assistance |
All built-in weights are trained on licensed, production-approved data — you can safely use them in commercial workflows.
Performance Impact
Here’s what you can expect when using pre-trained weights versus training from scratch:
Scenario | Cold Start (Random Weights) | With Pretrained Weights |
Initial convergence | Slow (thousands of steps) | Fast (hundreds of steps) |
Semantic learning | Learns from zero | Starts from known structure |
Early generalisation | Weak | Robust, even with few examples |
Total training time | Long | Up to 10x faster |
Example: A human matting model trained from scratch took over 3,000 steps to stabilise. The same setup, using HumanMatte weights, produced usable results in under 500 steps — with visibly better mattes and lower loss values.
Custom Checkpoints (Advanced Use)
Beyond built-in weights, you can also save your own CopyCat model checkpoints during training. This enables a form of transfer learning — using a trained model as a starting point for another related task.
Workflow:
- Train a model on Shot A
- Save the checkpoint
- Load that checkpoint to continue or fine-tune on Shot B
This is ideal for:
- Multi-shot sequences with the same subject or camera setup
- Scene-wide consistency in stylisation or cleanup
- Recurring characters or actors
- Episodic work, where models need to evolve over time
Custom checkpoints are a powerful way to build studio-specific ML tools that improve across a show or season.
Use Case Strategy
Here’s how to decide which model or strategy to use based on your task:
Task Type | Recommended Strategy |
Single-shot matte | Use built-in HumanMatte weights |
Sequential beauty cleanup | Train on one → Save checkpoint → Reuse downstream |
Stylisation / inpainting | Start with Deblur weights for pixel-based priors |
Actor or scene consistency | Train once → Create reusable checkpoint |
Fast prototyping | Always use pre-trained weights unless domain mismatch |
If your task overlaps visually with the domain of a built-in model (e.g., faces, skin, edges), a pretrained weight will almost always outperform a cold start — especially early in training.
Technical Tip
Pre-trained weights are most effective when:
- Your dataset is small or narrow (under 50 frames)
- The task involves natural textures, human figures, or consistent structure
- You need to train quickly or iterate multiple variations across a sequence
For best results, start with a pretrained weight and fine-tune with your own data. This combines speed with custom accuracy.
Summary
- Use built-in pretrained weights (Deblur, Upscale, HumanMatte) to accelerate CopyCat training and boost early model quality.
- Save and reuse custom checkpoints to maintain visual consistency across shots, scenes, or episodic content.
Expect significant reductions in training time, better convergence, and more robust generalisation — even with limited data.
Pretrained models aren’t just shortcuts — they’re the foundation of scalable, production-ready CopyCat workflows.
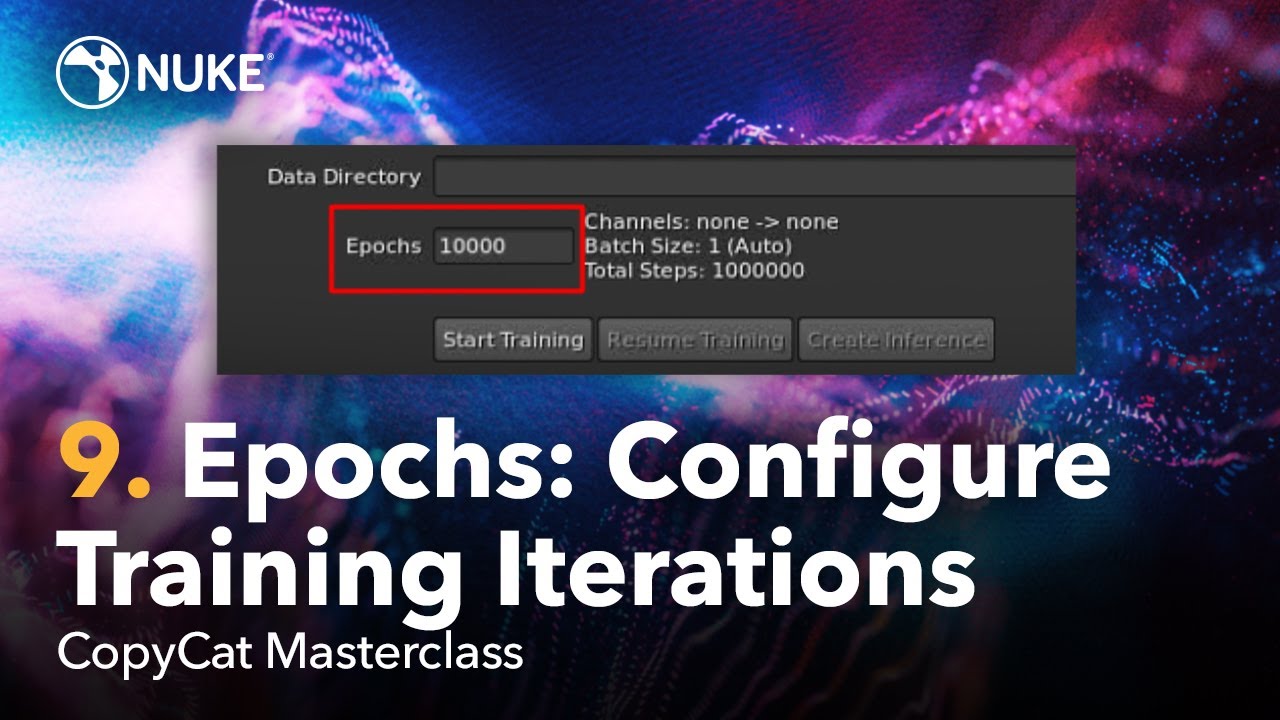
Epochs – Training Iteration Strategy
Learn how to correctly configure epochs in CopyCat training to achieve optimal results — based on your dataset size, task complexity, and whether you’re starting from scratch or using pretrained weights.
Tip: Don’t just guess your training duration — use epochs and step counts strategically to balance time, precision, and generalisation.
Terminology Recap
Before diving in, let’s clarify key terms used throughout the training process:
- Epoch: One complete pass of the model through the entire dataset.
- Step: One training update: a forward + backward pass on a single batch.
- Batch: The number of random image crops shown to the model per training step.
- Batch size: The number of random image crops shown to the model per training step.
- Total steps: The total number of model updates during training = (epochs × dataset size) / batch size
In CopyCat, steps control how often the model updates; epochs give you a dataset-size-relative way to manage learning duration.
Practical Targets
Here are typical step ranges based on dataset size and whether you’re using random initialisation or pretrained weights:
Use Case | Starting From | Recommended Steps | Notes |
Small dataset (single-shot) | Scratch | 15,000–30,000 steps | Go lower if compute or time is limited |
Small dataset (with pretrained) | Pretrained | 5,000–15,000 steps | Often sufficient for high-quality convergence |
Large dataset (general model) | Scratch or Pretrained | 100,000–300,000+ steps | Needed for robust generalisation across shots |
More steps ≠ better results unless the dataset justifies it. Use the loss curve to determine when to stop.
Quick Calculation Example
If you’re training with:
- 30 images
- Batch size = 8
Then:
- 1 epoch ≈ 30 / 8 = 4 steps
To reach 20,000 steps, you’d need 20,000 / 4 = 5,000 epochs
In CopyCat, it’s common to define training duration by steps, but estimating with epochs helps you budget time based on dataset scale.
Why Use Epochs (Not Just Steps)?
While CopyCat tracks training in steps, the epoch is a standard way of measuring training progress in machine learning. It scales naturally with:
- Dataset size
- Batch size
- Learning dynamics
Internally, CopyCat adjusts behaviour (e.g. learning rate decay, sampling logic) based on epoch progression, not just raw step count.
Think of epochs as a schedule — they allow CopyCat to learn efficiently no matter the size of your training set.
Optimisation Strategy
Here’s how to adjust epochs based on your goals:
Goal | Recommended Adjustment |
Faster convergence | Use pretrained weights and reduce total epoch/step count |
Higher precision | Increase total steps (15k–30k+) for better fidelity |
Avoid overfitting | Watch the training loss curve — if it flattens, stop early |
Improve temporal consistency | Increase epochs (and crop variation) to help with flicker |
Flickering outputs are often a result of under-training or inconsistent input variation — more epochs can help the model stabilize.
Summary
- Use epochs to estimate and plan your training based on dataset size and batch configuration.
- Convert your target step count into epochs using:
Total Steps = (Epochs × Dataset Size) / Batch Size - Pretrained models require fewer steps, especially for small or single-shot tasks.
- Monitor your loss graph in CopyCat to dynamically adjust your epoch count during training.
For production, build a simple spreadsheet to calculate step/epoch targets for different training setups — it’s an easy way to standardise training across your team.
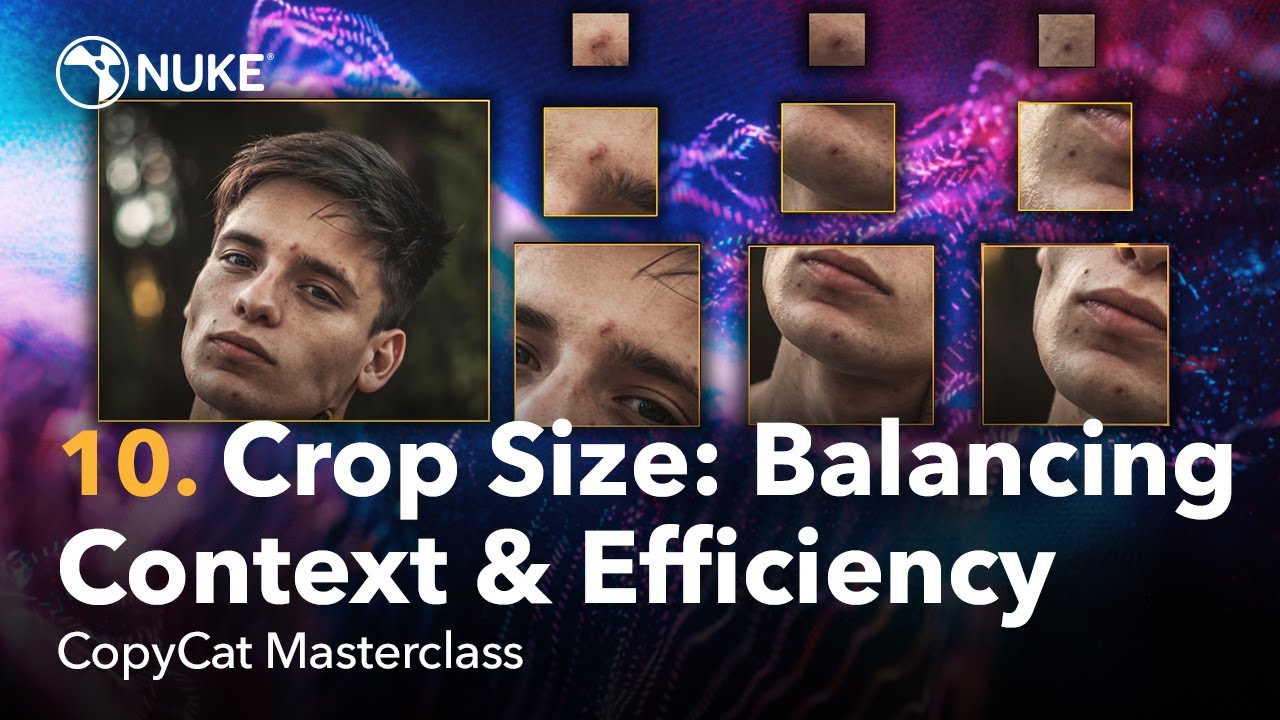
Crop Size – Context-Aware Training Control
Understand how to configure crop size in CopyCat training to strike the right balance between speed, GPU efficiency, and contextual awareness — especially when working on tasks that vary from low-level pixel edits to high-level semantic transformations.
Tip: Crop size directly affects how much the model “sees” — too small, and it can’t understand the scene; too large, and you may overload your GPU.
What Is Crop Size?
Crop size refers to the pixel dimensions (e.g. 256×256) of the random patches that CopyCat extracts from your input/ground truth image pairs during training.
Rather than training on full-resolution frames — which would be memory-intensive and slow — CopyCat randomly samples smaller regions (crops), allowing:
- Faster training cycles
- Lower memory usage
- More targeted learning on varied image areas
Crop size doesn’t change your final output resolution — it only affects training.
Why Crop Size Matters
The crop size determines how much of the image CopyCat sees at each step, which in turn impacts how well it can understand both local detail and global context.
Crop Size | Characteristics | Best For |
Small | Fast, low-memory, limited context | Pixel-local tasks (deblur, denoise, upscale) |
Large | Slower, high-memory, strong scene understanding | Semantic tasks (human matting, object removal) |
Example:
If you’re training a model to remove a blemish on a face, a small crop might confuse the blemish with another feature. A larger crop includes the eye, brow, or facial contour — giving the model enough context to make accurate edits.
Key Trade-offs
Parameter | Small Crop | Large Crop |
Speed | ✅ Faster training | ❌ Slower due to larger input |
Memory Usage | ✅ Lower GPU requirement | ❌ Higher GPU demand |
Context Capture | ❌ Weak (local info only) | ✅ Stronger global awareness |
Generalisation | ❌ May overfit local noise | ✅ Better real-world robustness |
For high-resolution source material, a small crop may completely miss key features — especially in sparse or complex frames.
Practical Guidance
Use these crop size ranges based on the type of task:
Task Type | Recommended Crop Size |
Pixel-based tasks (e.g., upscale, deblur) | 128–256 px |
Localised edits (e.g., blemish removal, object cleanup) | 384–512 px |
Semantic or full-subject tasks (e.g., human matting, facial work) | 512–768+ px |
These are square crops by default (e.g. 512×512), but you can adjust to fit non-square aspect ratios if needed — just ensure input and ground truth align exactly.
Hardware Consideration
- Larger crop sizes require more VRAM, especially when paired with larger batch sizes or Large models.
- Monitor your GPU usage during training. If Nuke crashes or training stalls, reduce either:
- Crop size
- Batch size
- Or switch to a smaller model architecture
- Crop size
On 8–12 GB GPUs, 512×512 is often the upper limit for batch sizes above 4 when using the Large model.
Summary
Task Type | Recommended Crop Size |
Low-level pixel tasks (upscale, blur) | 128–256 px |
Localised edits (e.g., minor cleanup) | 384–512 px |
Semantic work (e.g., human matting) | 512–768+ px |
If your model isn’t converging well — or seems confused by the visual context — try increasing the crop size to help it see more of the surrounding structure.
Batch Size – Optimising GPU Throughput and Dataset Efficiency
Learn how to set the Batch Size in CopyCat training to balance GPU memory usage, training speed, and model stability — especially when working with high-resolution crops or complex tasks.
Tip: Batch size is one of the most GPU-sensitive parameters in CopyCat. Setting it right can drastically improve training efficiency and prevent crashes.
What Is Batch Size?
Batch size defines the number of training crops (input/ground truth pairs) that CopyCat processes in parallel during each training step.
- Each step applies a forward and backward pass on the full batch to update model weights.
- Larger batches provide more reliable gradient estimates.
Smaller batches allow for faster, more frequent updates and consume less GPU memory.
Think of batch size as how much “learning material” the model sees at once — bigger batches offer a clearer signal but require more GPU power.
Effects of Batch Size
Batch Size | Memory Usage | Training Stability | Gradient Noise | Convergence Behaviour |
Small | ✅ Low GPU memory usage | ❌ Less stable | ❌ High | ✅ Fast updates, but more jittery |
Large | ❌ High GPU memory usage | ✅ Smooth learning | ✅ Low | ❌ Slower per-step updates, more stable |
Noisy tasks (e.g. with aggressive data augmentation or lighting variance) benefit from slightly larger batches for stability
Best Practices
Start Small
- Begin with batch size = 2 or 4 when using moderate crop sizes (e.g. 512×512).
- Monitor VRAM usage closely — especially on older or mid-range GPUs.
Match to Crop Size
- Smaller crops (e.g. 256×256) → You can afford larger batches (4–8).
- Larger crops (e.g. 768×768) → You’ll need to reduce batch size (1–2) to avoid memory issues.
GPU-Dependent Tuning
GPU Class | Typical Max Batch Size (512×512 crop) |
RTX A6000, RTX 4090 | 4–8 |
RTX 3090, 4080 | 2–6 |
RTX 2080 Ti, 3070, M1 Max | 2–4 |
If you're hitting VRAM limits or CopyCat stalls, lower your batch size first, not the crop size.
Relation to Steps and Epochs
Batch size impacts how quickly your model sees all the data:
Steps = (Number of crops per epoch ÷ Batch size) × Epochs
- Smaller batches → More weight updates → More responsive training, but more steps needed.
- Larger batches → Fewer, more stable updates → Slightly slower responsiveness but better gradient estimates.
If you reduce batch size, consider increasing epochs to maintain your target step count.
Recommended Batch Sizes by Use Case
Use Case | Recommended Batch Size |
Pixel-level tasks (e.g. deblur, upscale) | 4–8 |
Semantic edits (e.g. matting, face work) | 2–4 (crop size-dependent) |
High-resolution crops (e.g. 768×768+) | 1–2 (monitor VRAM) |
Batch size is the first setting to adjust if CopyCat is crashing, underperforming, or running slowly on your hardware.
Final Notes
- Batch size is a core control lever for balancing speed, memory use, and convergence.
- Always test with a small batch, then scale up if there’s room on the GPU.
- Combine with intelligent crop sizing (see Part 10) to maximise training stability.
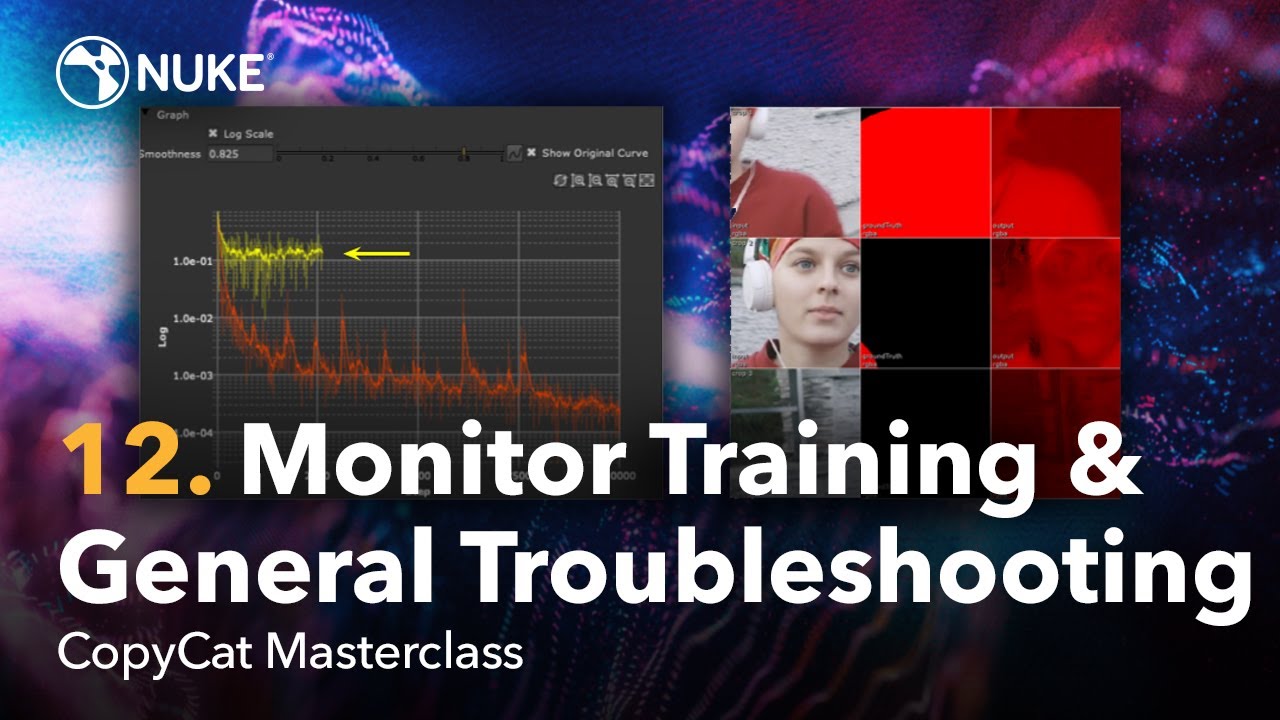
Monitoring Training & Troubleshooting ML Workflows
Learn how to monitor CopyCat training progress effectively, interpret loss behaviour, and resolve common training issues — particularly in fast-paced, high-stakes production environments.
Tip: Machine learning isn’t a black box. If you know how to read the loss curve and spot visual artefacts early, you can save hours of wasted training time.
Monitoring CopyCat Training
Where to Look
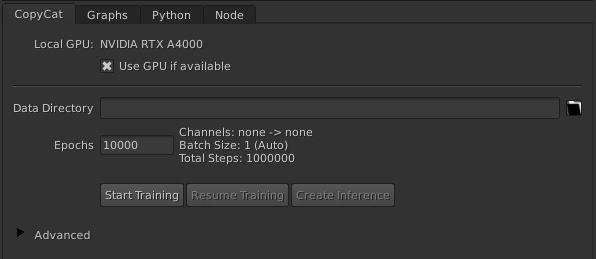
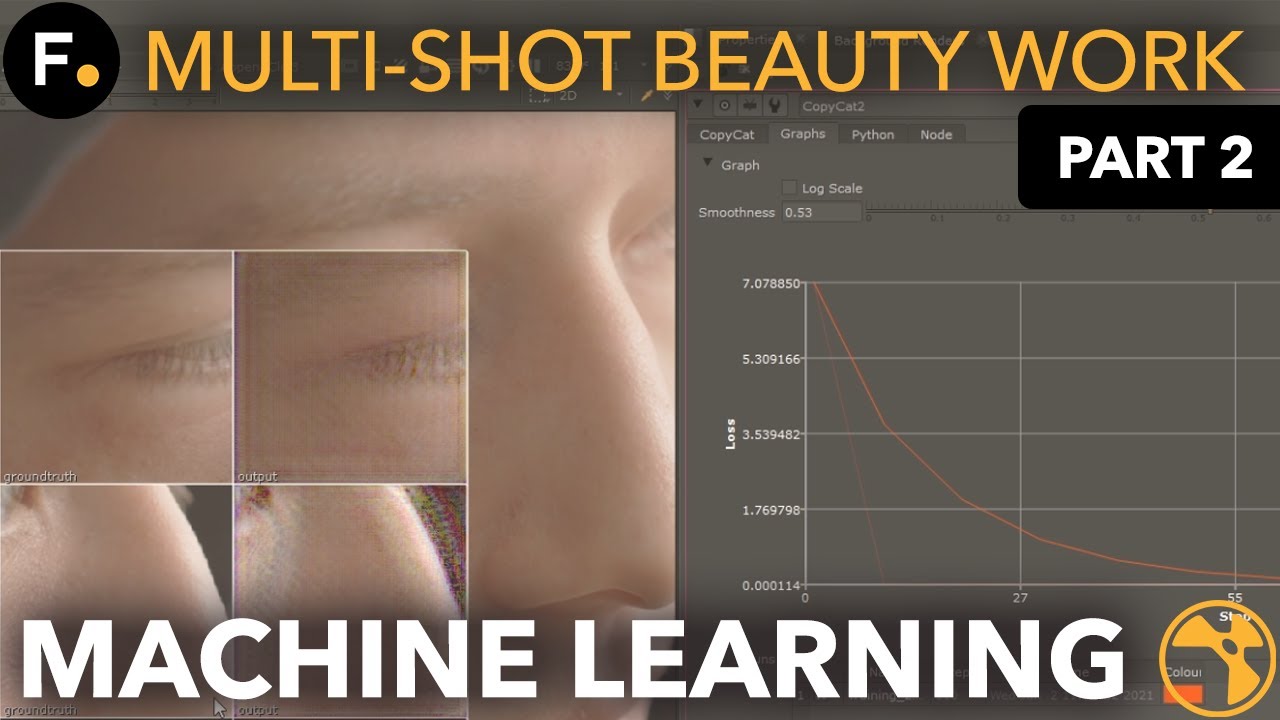
In the CopyCat Graph Tab, you’ll find:
- Loss Curve (green line) — the most important visual cue for training performance.
This curve shows how the model’s error (loss) is decreasing across training steps.
What a Good Loss Curve Looks Like
Training Phase | Expected Loss Curve Behaviour |
Early Training | Sharp drop — model is learning to “memorise” training pairs |
Mid to Late | Slower, more gradual decline — model begins to generalise |
Plateau | Curve flattens — model has learned all it can from the current dataset |
A gently flattening curve is normal. But sharp spikes or stagnation from the start signal a deeper issue.
What to Watch For (Loss Curve Troubleshooting)
Loss Behaviour | Interpretation | Suggested Fix |
No decrease | Poor frame selection or misaligned data | Review training pairs; check input vs ground truth alignment |
Oscillating loss | High learning rate or low dataset variation | Lower learning rate; diversify training set |
Early flattening | Underfitting — model too small or task too easy | Use larger model or increase crop size |
Sudden spikes | Superwhite pixels or format mismatch | Clamp values or convert to log colour space |
General Troubleshooting Guidelines
1. Superwhite Pixel Artifacts
- Problem: Values above 1.0 (common in linear EXRs) skew the training loss.
- Fix: Clamp inputs to 0–1 using a Clamp node, or convert to logarithmic colour space before training.
2. Colour Space Mismatch
- Problem: Training and inference in different colour spaces causes inaccurate results.
- Fix: Use OCIOColorSpace or Colorspace nodes to ensure input, ground truth, and inference all use the same colour space (e.g. Rec.709 or ACEScg).
3. Misaligned or Extraneous Channels
- Problem: Including alpha, depth, or other non-RGB channels can confuse the model.
- Fix: Use a Remove node to keep only the required channels — usually RGB, or a single channel for mask-style tasks.
4. Batch Size Selection
- Problem: Batch size too large can crash the model; too small may cause noisy training.
- Fix:
- Use batch size 2–4 for single-shot training with 512×512 crops.
- Use batch size 1–2 for high-resolution crops (768+).
- For generalised datasets (10k+ frames), batch size 8–16+ can improve stability.
- Use batch size 2–4 for single-shot training with 512×512 crops.
5. Training Stops or Crashes
- Problem: Running out of GPU memory or CPU resources.
Fix: Lower crop size or batch size to stay within VRAM limits. Check GPU usage in Task Manager or via system monitors.
Restarting training from a saved checkpoint can prevent losing earlier progress.
Pro Tip: Check for Generalisation
After training finishes:
- Test the model on unseen frames (not used in training).
- If performance drops significantly on these frames, the model has likely overfitted — meaning it memorised the training data without learning how to generalise.
Overfitting is more likely with small datasets or tiny crop sizes. Add variation or increase crop size to help the model generalise.
Summary
Use Case | What to Monitor | What to Tune |
Single Shot | Smooth, fast-falling loss | Frame selection, crop size, batch size |
Generalised Tasks | Slow, steady loss reduction | Batch size ↑, dataset diversity ↑ |
Noisy Outputs | Loss spikes, visual artefacts | Clamp/log space, remove extra channels |
Cross-reference loss behaviour with visual outputs. A “good” loss curve means nothing if the frames don’t look right — and vice versa.
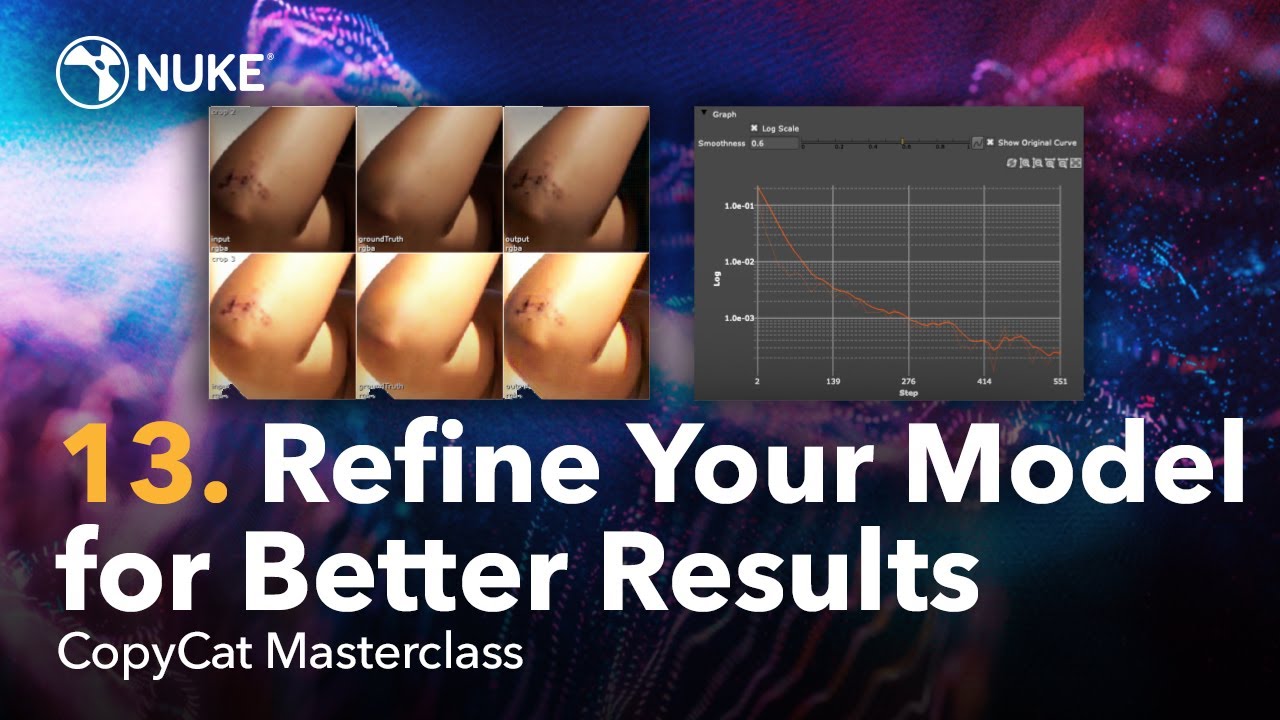
Refining CopyCat Model Performance – Two Key Strategies
Learn how to improve the quality and generalisation of your CopyCat models by identifying common weaknesses and applying targeted refinements — without needing to start from scratch.
Tip: Most CopyCat models don’t need re-training — they just need more training or better-targeted data.
Strategy 1: Train for More Steps (Undertrained Models)
Symptoms:
- Model underperforms even on frames it was trained on.
- The loss curve is still decreasing steadily — no sign of convergence yet.
Cause:
The model is simply undertrained. It hasn’t seen enough iterations to fully learn the task.
Solution:
- Increase the number of epochs to extend training.
- Use CopyCat’s “Resume Training” button — this continues from the current model state without resetting.
- Keeps all previously learned weights.
- Keeps all previously learned weights.
Saves time by picking up exactly where you left off.
If loss is still dropping and your output looks half-baked — keep training. You’re not done yet.
Strategy 2: Add Targeted Training Data (Selective Failures)
Symptoms:
- The model performs well on most frames, but fails on specific ones — often with:
- Different camera angles
- Sudden lighting changes
- Motion blur
- Occlusion (e.g. a hand passing in front of the subject)
- Different camera angles
Cause:
These frames aren’t well-represented in the training set. The model has never seen a similar scenario before.
Solution:
- Pinpoint where and why the model fails.
- Add targeted examples that reflect the problem:
- Include full-frame examples if the issue is global (e.g. lighting or camera shift).
- Use cropped regions if the issue is localised (e.g. occlusion around the eyes).
- Include full-frame examples if the issue is global (e.g. lighting or camera shift).
- Apply data augmentation to create synthetic examples:
- Simulate motion blur, brightness changes, or occlusion.
- Shift or scale the subject in the frame to increase diversity.
- Simulate motion blur, brightness changes, or occlusion.
You don’t need to overhaul the entire dataset. One or two smartly chosen frames can fix a recurring issue.
Summary
To refine CopyCat model performance:
Problem | Action |
Undertrained model, weak results | Resume training for more steps |
Selective failure on specific frames | Add targeted training data (real or augmented) |
Key Reminders:
- Don’t stop just because training ends — continue if the loss is still improving.
- Use your eye and your data: add frames where the model is failing, not just at random
- Small, smart dataset improvements are often more valuable than big, blind ones.
Conclusion
Nuke’s CopyCat node represents a transformative shift in how artists approach shot-specific tasks in visual effects — blending the power of machine learning with the creative control of node-based compositing. This guide has outlined not just how CopyCat works, but how to get the most out of it through smart data selection, targeted training strategies, and practical troubleshooting. Whether you’re cleaning up blemishes, generating mattes, or stylising complex footage, CopyCat empowers artists to build custom, high-quality tools tailored to each shot. With the right preparation and understanding, even a small dataset can deliver production-ready results — fast, flexible, and fully integrated into your Nuke pipeline.
Terminology Recap
Here’s a beginner-friendly glossary of terms found in the CopyCat documentation. These explanations aim to help newcomers understand core concepts related to machine learning, visual effects (VFX), and the CopyCat tool in Nuke.
- Alpha Matte: A black-and-white image used to define transparency — white = visible, black = invisible. Think of it like a stencil that cuts out a subject from the background.
- AppendClip: A Nuke node that combines multiple image sequences into one — useful for feeding cropped training frames into CopyCat.
- Backpropagation: The process by which a neural network updates its internal settings (weights) to improve its output, based on how wrong it was in the previous step.
- Batch: A small group of image samples shown to the model at once during training. It helps the model learn more efficiently by processing several examples in parallel.
- Batch Size: The number of image samples in each batch. Larger sizes can improve stability but require more GPU memory.
- Clamp: A node that restricts pixel values to a specific range (e.g., 0–1) to prevent extreme brightness or colour values from disrupting training.
- Colour Space: A way of representing colours in digital images. Common types include Rec.709 and ACEScg. Training and inference must use the same colour space to avoid errors.
- CopyCat: A node in Nuke that lets you train a neural network on a shot-by-shot basis, using before-and-after images to automate VFX tasks.
- Crop Size: The size (in pixels) of the image regions used for training. Small crops train faster but may lack context; large crops offer more visual context but use more memory.
- Data Augmentation: A technique to artificially expand your dataset by modifying existing images (e.g., flipping, color shifts) to simulate new scenarios.
- Deep Neural Network (DNN): A type of machine learning model with many layers that learns complex patterns in data — like how to clean up or enhance images.
- Epoch: One complete pass through the entire training dataset. Think of it as a training “lap” for the model.
- Extraneous Channels: Additional image data (like depth or motion info) not needed for a given task. These should be removed to avoid confusing the model.
- Forward Pass: The first step in training where the model predicts an output from the input image.
- Ground Truth: The correct result you want the model to learn. It’s the “answer” you’re training toward — e.g., a cleaned image or matte.
- Inference: The stage where the trained model is used to make predictions on new data.
- Iteration: A single training step where the model updates based on what it learned from a batch of images.
- Learning Rate: A setting that controls how fast the model adjusts during training. Too high = unstable learning; too low = slow progress.
- Loss Curve: A graph showing how the model’s error decreases during training. A downward trend means the model is learning.
- Loss Function: A formula that measures how far off the model’s output is from the correct answer (ground truth). The goal is to reduce this number over time.
- Model Checkpoint: A saved state of the model during training. You can resume training from a checkpoint or reuse it for related tasks.
- Model Size (Small, Medium, Large): Refers to the capacity and complexity of the neural network. Larger models can learn more but take longer to train.
- Overfitting: When a model memorizes the training data too closely and fails to generalize to new images. It performs well on training but poorly on real-world use.
- Pixel Values: The brightness and colour information stored at each point in an image. Machine learning models work by analysing these values.
- Pretrained Weights: Previously trained models that already understand basic visual patterns. Starting from these can make your training much faster and more accurate.
- Region of Interest (ROI): The specific area in an image where a visual effect is being applied — for example, a bruise on a face.
- Reformat Node: A Nuke node used to change image resolution, often needed after cropping.
- Shot-Specific Model: A CopyCat model trained to work on one particular VFX shot. It usually doesn’t work well on other shots.
- Super-White Pixels: Pixel values brighter than the normal range (above 1.0). These can break the training unless clamped or adjusted.
- Training Data: The set of before-and-after images used to teach CopyCat what to do.
- Training Step: One cycle where the model processes a batch, calculates loss, and adjusts its weights.
- Underfitting: When a model hasn’t trained long enough or isn’t complex enough to learn the task properly. It performs poorly on both training and new data.
- Visual Generalisation: A model’s ability to apply what it learned from training examples to new, unseen images.
- VRAM: Video RAM on your GPU — it limits how large your crops, batches, or models can be before crashing or slowing down.
Nuke CopyCat TD – Custom GPT
This custom GPT — Nuke CopyCat TD v1.0 — is a specialized AI assistant designed to help artists, compositors, and technical directors work effectively with Foundry Nuke’s CopyCat tool and its related machine learning workflows (like AIR nodes and the Inference node).
What It Does:
Think of it as your senior TD mentor for anything related to CopyCat. It helps you:
Understand how CopyCat and machine learning concepts work inside Nuke.
Set up training with the right parameters (epochs, batch size, crop size, model type, etc.).
Troubleshoot problems, such as bad predictions, loss curve issues, or GPU crashes.
Optimize results, speed up training, and improve model generalization.
Design workflows for specific VFX tasks — like matte generation, relighting, cleanup, or stylization.
It always provides a 📦 Recommended CopyCat Parameters section tailored to your shot, task, and hardware, with plain-English explanations for every choice.
Nuke CopyCat TD
CopyCat Masterclass: Maximize Nuke’s Machine Learning Tool
5:23

2:49
2:50
2:15

2:12
3:00

2:17

3:59
1:50
2:49

1:41
4:16
2:30
57:30
Machine Learning with CopyCat

42:43

23:47

3:32
1:01
29:03
9:14
9:49

1:21

20:56
Machine Learning with CopyCat 02
9:16
9:12
10:08
3:13
CopyCat videos

1:13:39

2:52
1:41:45

24:31
2:18
Frequently Asked Questions (FAQs)
1. What is CopyCat in Nuke?
CopyCat is a machine learning node in Foundry’s Nuke that lets users train custom AI models using before-and-after image pairs to automate complex visual effects tasks.
2. How does CopyCat work?
CopyCat uses supervised learning to analyze differences between input (raw plate) and ground truth (desired result) images, training a neural network to apply the same transformation across a sequence.
3. What can I use CopyCat for in VFX?
CopyCat is ideal for tasks like rotoscoping, object removal, beauty work, stylization, deblurring, and generating mattes — all with pixel-level consistency.
4. How many training images does CopyCat need?
For shot-specific models, 5–30 carefully chosen frames are typically enough. For general-purpose tools, you may need 10,000+ training pairs.
5. Can CopyCat be used for multiple shots or projects?
Not easily. CopyCat models are usually shot-specific. However, with a large and diverse dataset, generalized models can be trained for broader use cases.
6. What is the Inference node in CopyCat?
Once a CopyCat model is trained, the Inference node applies the learned transformation across entire shots automatically.
7. How can I speed up CopyCat training?
Use smart cropping to focus training on the region of interest, and data augmentation to synthetically expand your dataset with variations in lighting, pose, and background.
8. What are best practices for CopyCat training data?
Ensure input/output pairs are aligned, include varied lighting and motion, and clean extraneous channels to prevent confusing the model.lly.