A free volumetric god rays tool for Nuke
Introduction
A deep look at how light scattering actually works, the math behind raymarching, and the BlinkScript-powered gizmo I built so you can create cinematic volumetric light shafts inside your comp.
Contents
What Are Volumetric Light Shafts, Really?
You’ve seen them everywhere. Sunlight pouring through a forest canopy at dawn, slicing the morning mist into solid-looking columns. Coloured beams falling from a stained-glass window into the dust of a cathedral. Headlights cutting through fog like blades. We call them god rays, crepuscular rays, or in compositing, volumetric light.
They’re the kind of effect that turns an image into a painting. And they’re surprisingly tricky to fake.
I built a free Nuke gizmo called aeVolumeRays that produces these shafts directly in compositing, no need to re-render in 3D. The whole thing runs inside a single BlinkScript node, it’s GPU-accelerated, and it’s available for free on my GitHub.
But before I show you how to use it, I want to spend a few minutes on something I think is much more interesting: why these rays exist in the first place, and the surprisingly elegant cheats we use to draw them on a screen.
Why You Can See Light at All
Here’s a fact that surprises most people the first time they hear it: you can’t actually see light. Not directly. You only ever see light when it bounces off something and reaches your eye.
Think about a laser pointer in a perfectly clean vacuum. From the side, you’d see absolutely nothing. The dot it makes on a wall is the only proof the beam exists at all. Light, by itself, is invisible.
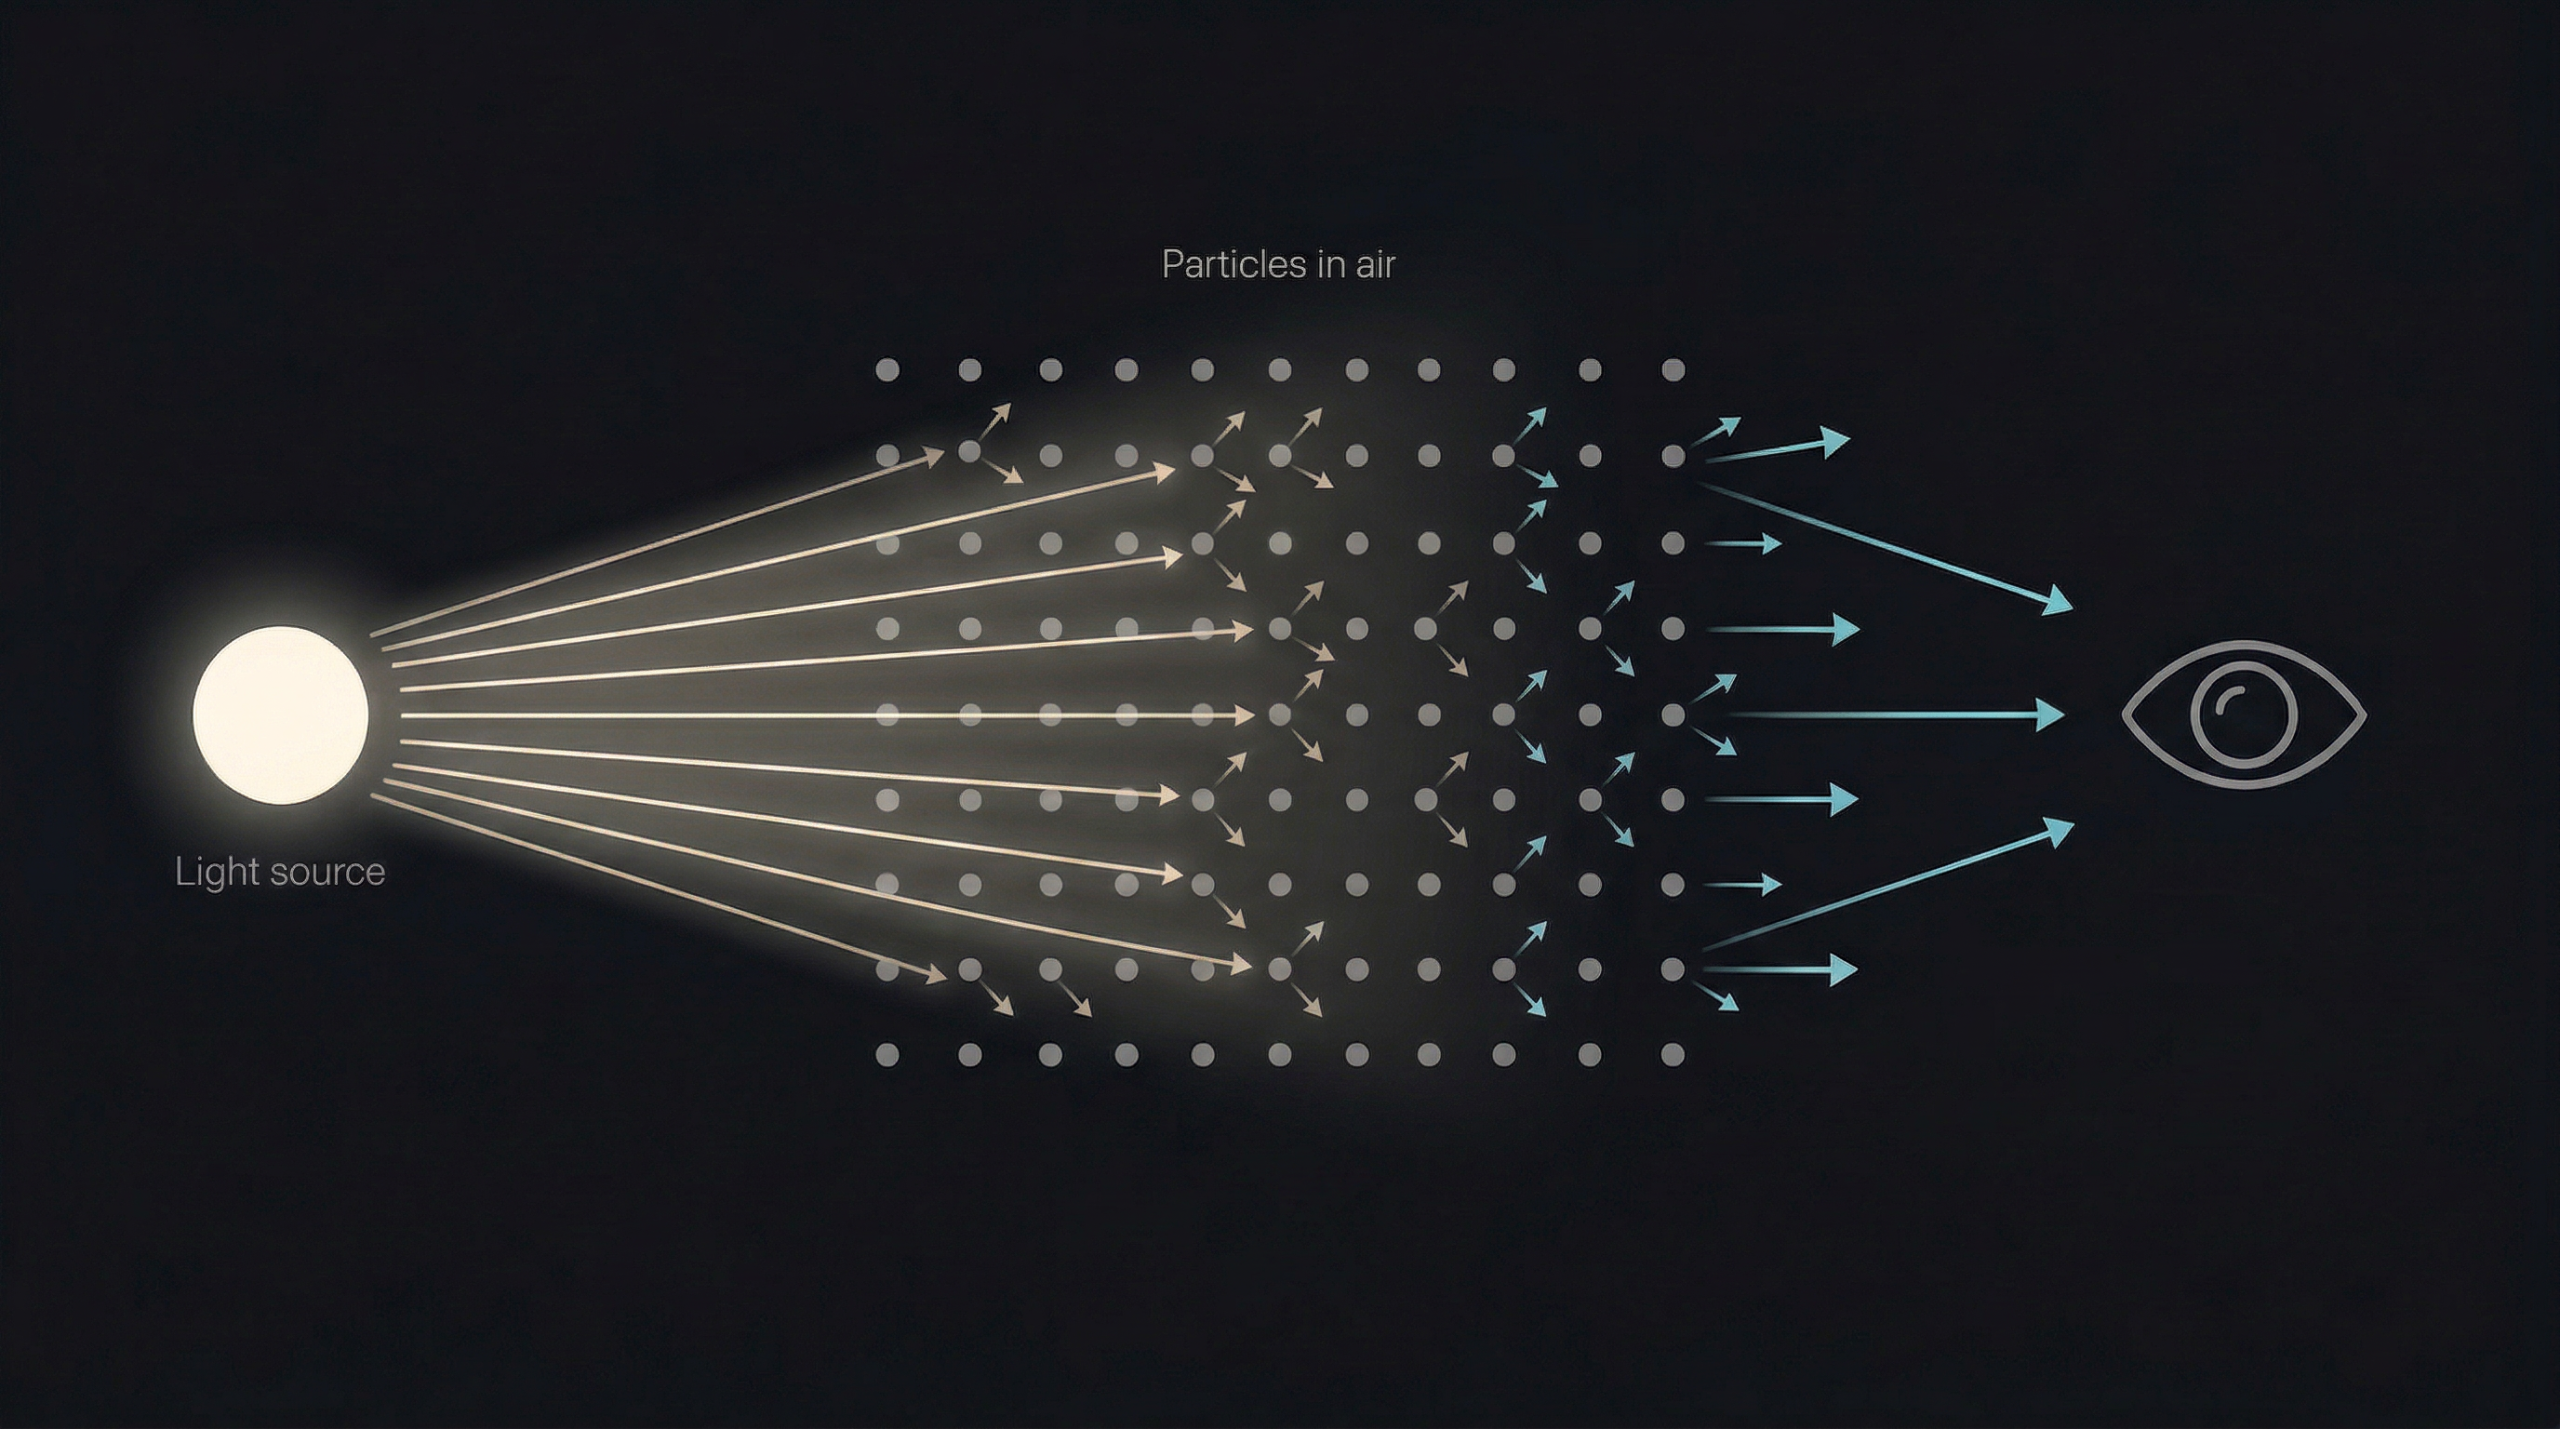
So why do we see beams of sunlight in a forest? Because the air isn’t empty. It’s full of stuff, dust, water vapour, pollen, smoke, microscopic particles you’d never notice. When sunlight hits one of those tiny particles, the particle scatters a fraction of that light in every direction. And some of that scattered light ends up reaching your eye.
Multiply that by billions of particles along the path of a single sunbeam, and the beam becomes visible from the side. You’re not seeing the light itself. You’re seeing the air glowing along the path the light is taking.
This phenomenon is called volumetric scattering, and it’s the reason fog, mist, smoke, and even very humid air make light shafts look so dramatic. The denser the medium, the more particles per cubic metre, and the more the light “lights up the air” instead of passing invisibly through it.
This is also why a perfectly clear day with no humidity feels visually “flat” compared to a misty morning. Same sun, same scene but without particles to catch the light, the air contributes nothing.
Scattering Isn’t Equal in All Directions
Here’s a curious detail that physicists love and that turns out to be crucial for making god rays look right: when light hits a particle, it doesn’t scatter equally in every direction. Most particles scatter more light forward than backward.
This is why sunsets feel so saturated when the sun is in front of you, and why the same fog looks weak and grey when the sun is behind you. It’s why god rays in a forest look most intense when you’re roughly facing toward the sun. The air is throwing more photons at your eye in that direction than in any other.
Physicists describe this with something called the Henyey-Greenstein phase function. It’s a clean mathematical formula with a single parameter — usually called g — that controls how anisotropic the scattering is:
p(cos θ) = (1 - g²) / (4π · (1 + g² + 2g·cos θ)^1.5)Don’t let the formula scare you. The only thing that matters is what g does:
- g = 0 — light scatters equally in all directions (isotropic). Looks like a uniform glow.
- g > 0 — light scatters mostly forward. Strong god ray effect when you face the light. This is the realistic case for dust and fog.
- g < 0 — light scatters mostly backward. Rare in nature, but useful for some artistic effects.
aeVolumeRays exposes this g parameter directly. A value of around 0.7 gives you that classic forward-scattering look that makes shafts pop when the camera faces toward the light source. It’s one of the most impactful single knobs in the entire gizmo, and now you know exactly what it does and why.

How a Computer Fakes All of This
Real volumetric renderers Arnold, V-Ray, Karma actually simulate millions of these scatter events per pixel. They’re physically accurate and they produce gorgeous results. They’re also slow. A frame can take minutes or hours.
In compositing we don’t have minutes per frame. We need this in seconds, ideally interactive, while we tweak knobs and watch the result update. So we cheat. The technique is called raymarching, and it’s one of those ideas that sounds complicated until you see it drawn out.
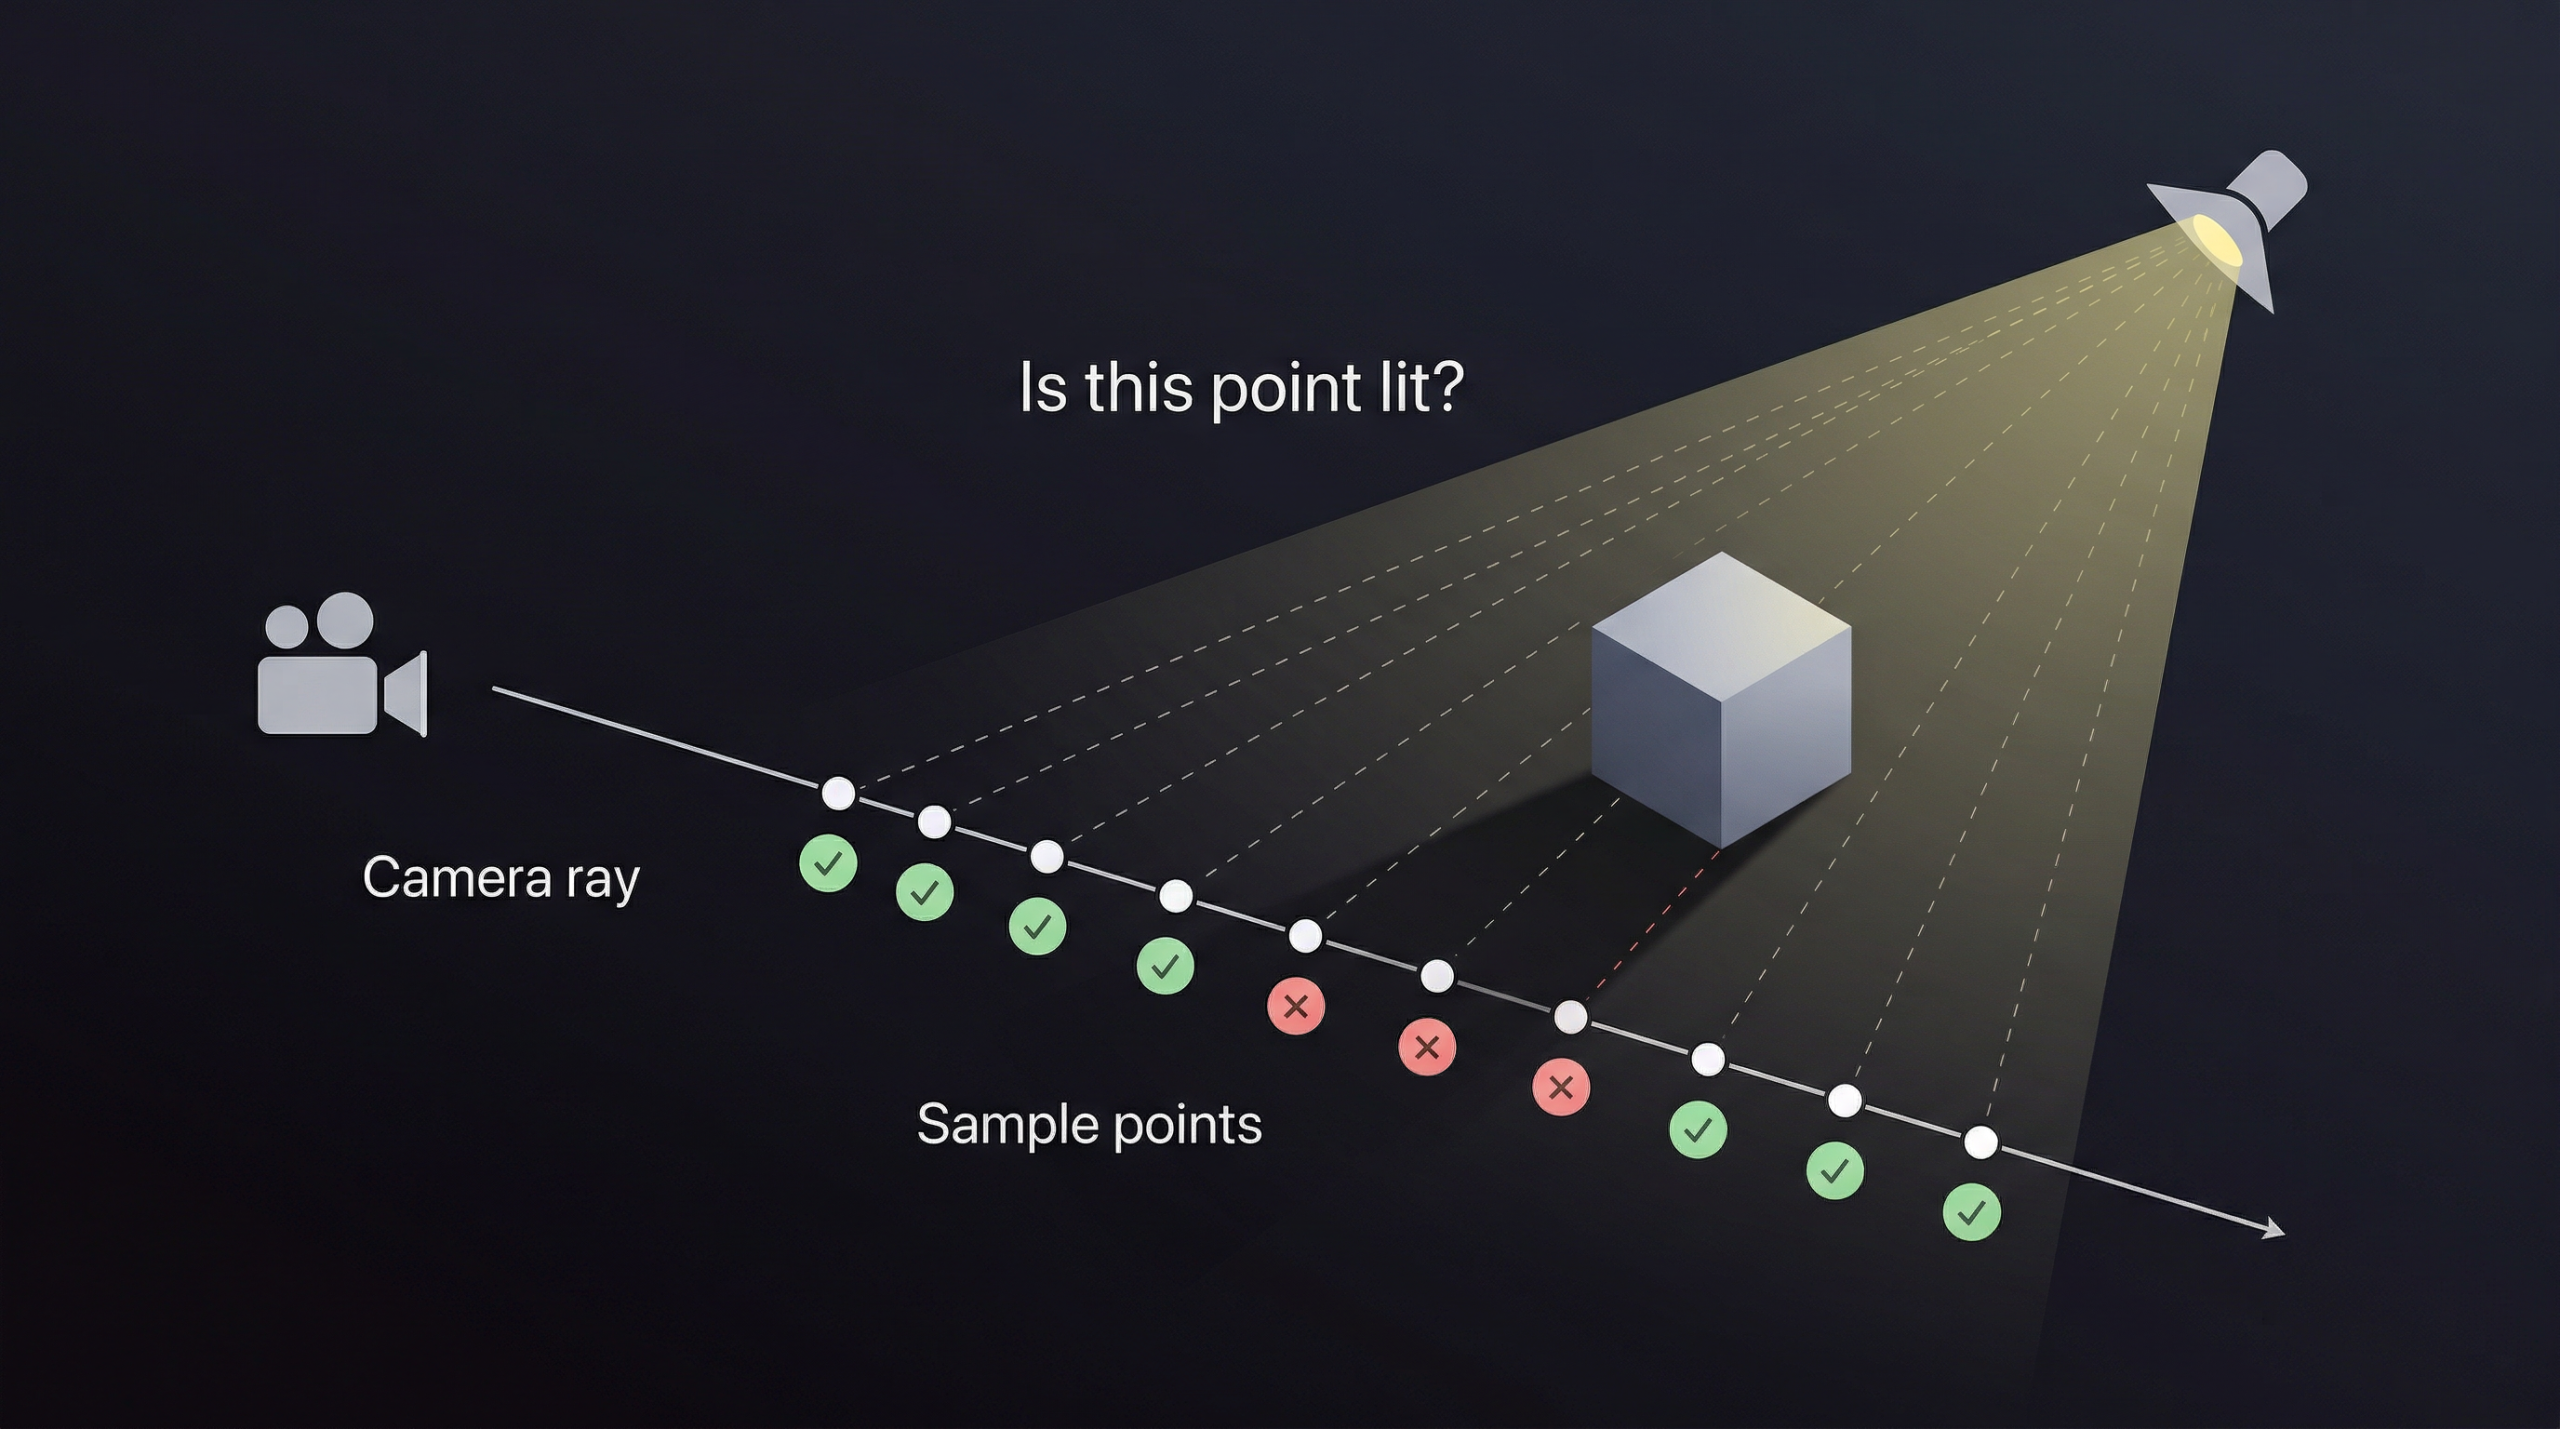
Here’s the idea. For every pixel in the final image, we imagine a ray shooting out from the camera into the 3D scene. Instead of asking what surface that ray hits which is what a normal renderer does we walk along the ray in small, evenly-spaced steps. At every step, we ask one simple question:
“If I were standing here, in mid-air, how much light from the spotlight would be reaching me right now?”
If the answer is “a lot” (you’re directly in the light’s beam, with nothing blocking it), that little patch of air glows brightly. If the answer is “none” (you’re inside the shadow of an object), the air there stays dark. We add up all those tiny glowing contributions along the ray, and we get the final brightness of that pixel.
In pseudocode, the entire raymarching loop looks roughly like this:
					for each pixel:
    ray = build_ray_from_camera(pixel)
    accumulated_light = 0
    transmittance = 1.0

    for step in 0 to num_steps:
        sample_pos = ray.origin + ray.direction * step_size * step

        light_at_sample = check_if_lit(sample_pos)
        contribution = light_at_sample * transmittance * step_size

        accumulated_light += contribution
        transmittance *= attenuation_per_step

    pixel_color = accumulated_light
That’s the entire foundation of volumetric lighting. Everything else the noise, the shadows, the cookies, the haze is just refinement on top of these few lines.
The beautiful trick is that the air doesn’t actually need to be there. We’re inventing it. We assume it’s full of invisible particles at a controllable density, and we compute how much each particle would scatter toward us if it existed. The result looks completely physical, but nothing was simulated it was sampled.
Beer-Lambert: Why Light Dies Through Fog
There’s one more piece of physics worth understanding before we move on. When light travels through a participating medium fog, smoke, water, dusty air it gets weaker the further it goes. Some of it gets absorbed. Some of it gets scattered away from its original direction. Either way, less light makes it through.
This loss isn’t linear. It’s exponential. The more medium you pass through, the more is lost, and the rate of loss compounds. The relationship is described by the Beer-Lambert law:
I(d) = I₀ · e^(-σ · d)
Where I₀ is the original intensity, d is the distance travelled through the medium, and σ (sigma) is the extinction coefficient basically, how dense the fog is.
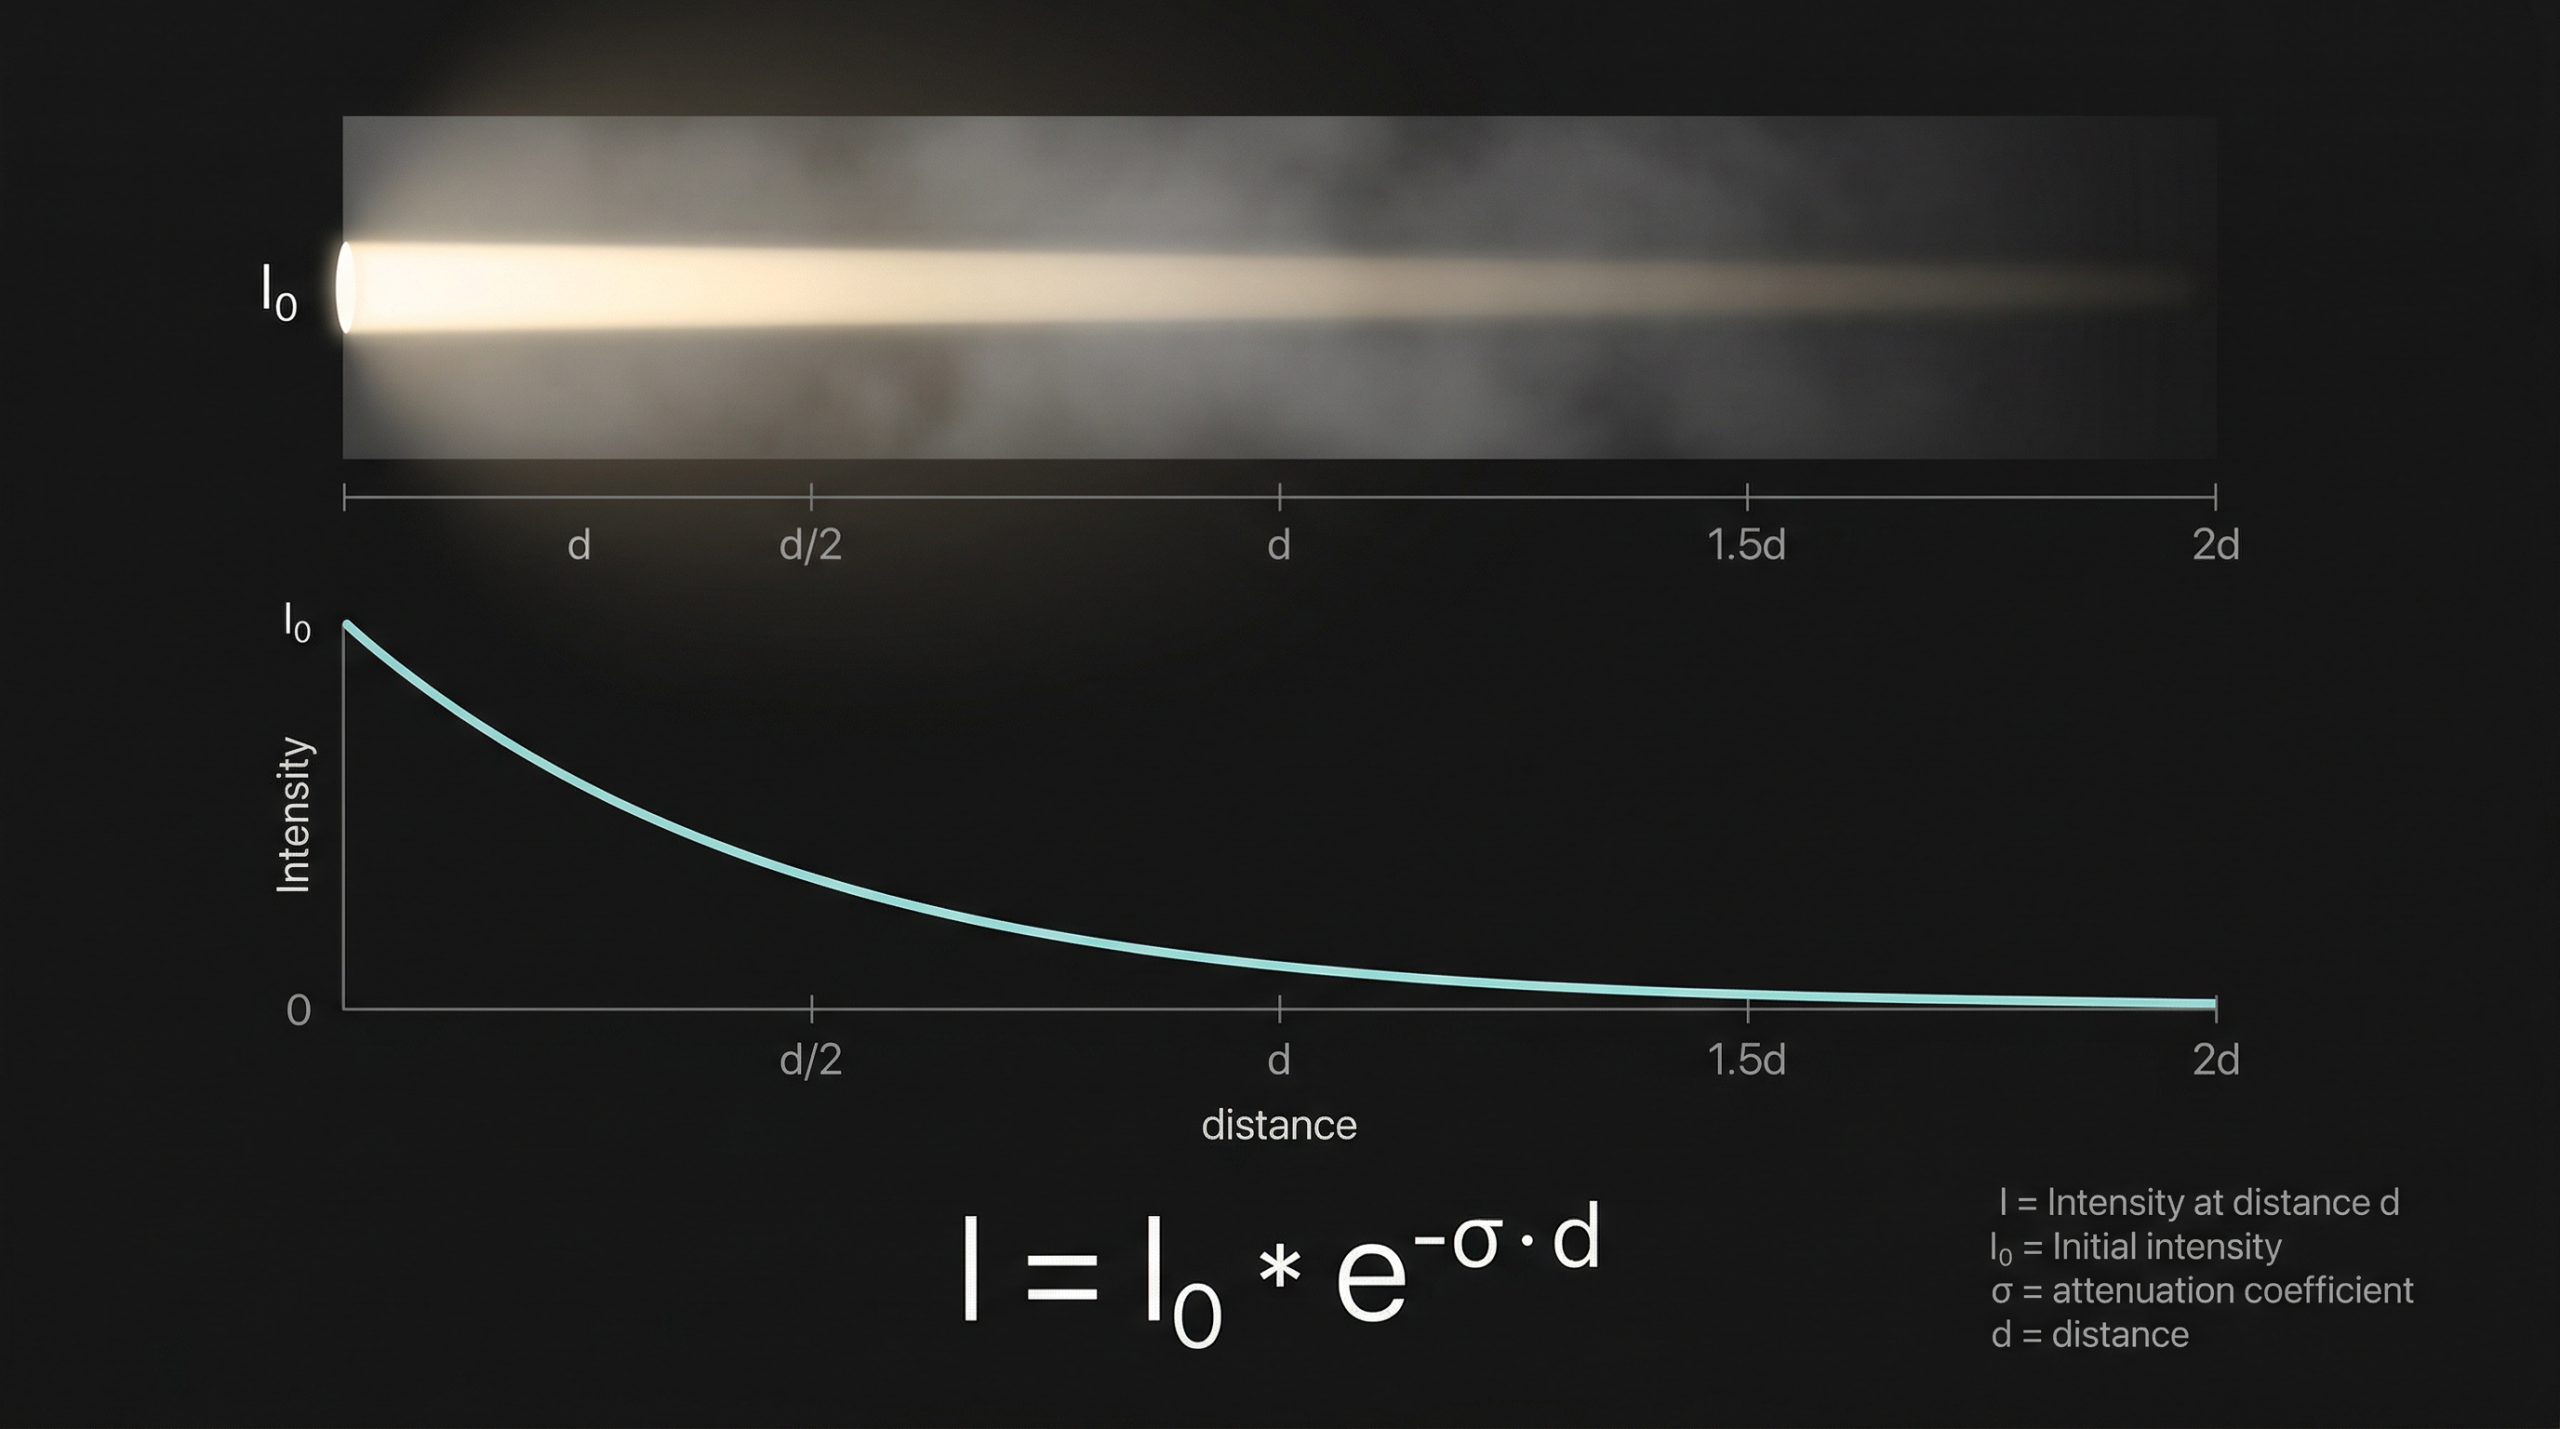
This is why a torch beam can punch through 5 metres of light fog and look perfectly clean, but a beam of the same brightness gets completely swallowed by 50 metres of dense fog. The decay isn’t 10× — it’s exponential.
Inside the raymarching loop, we account for this with a variable called transmittance, which starts at 1.0 (full brightness) and gets multiplied by a per-step attenuation factor as we walk along the ray:
step_T = exp(-extinction * step_size)

transmittance *= step_T
Each sample’s contribution is multiplied by the current transmittance, so samples deeper into the volume contribute less and less. This is what gives the shaft its natural falloff and what stops fog from looking like a flat fill.
The extinction parameter in aeVolumeRays maps directly to that σ coefficient. Crank it up and the shaft becomes a soft, foggy bloom that fades quickly. Drop it and you get long, clean shafts that travel forever.
The Biggest Shortcut: Shadow Maps
Now, there’s still a problem. To know whether a sample point in mid-air is “in the light” or “in shadow”, we’d need to ask: is there anything between this point and the light source?
The honest way to answer that is to trace another ray from the sample point back to the light, and check if it hits any geometry along the way. Doing this for every sample, for every pixel, in real time? That’s billions of intersection tests per frame. Way too slow for compositing.
So we use a trick that real-time graphics has relied on for decades, and it’s wonderfully simple: the shadow map.
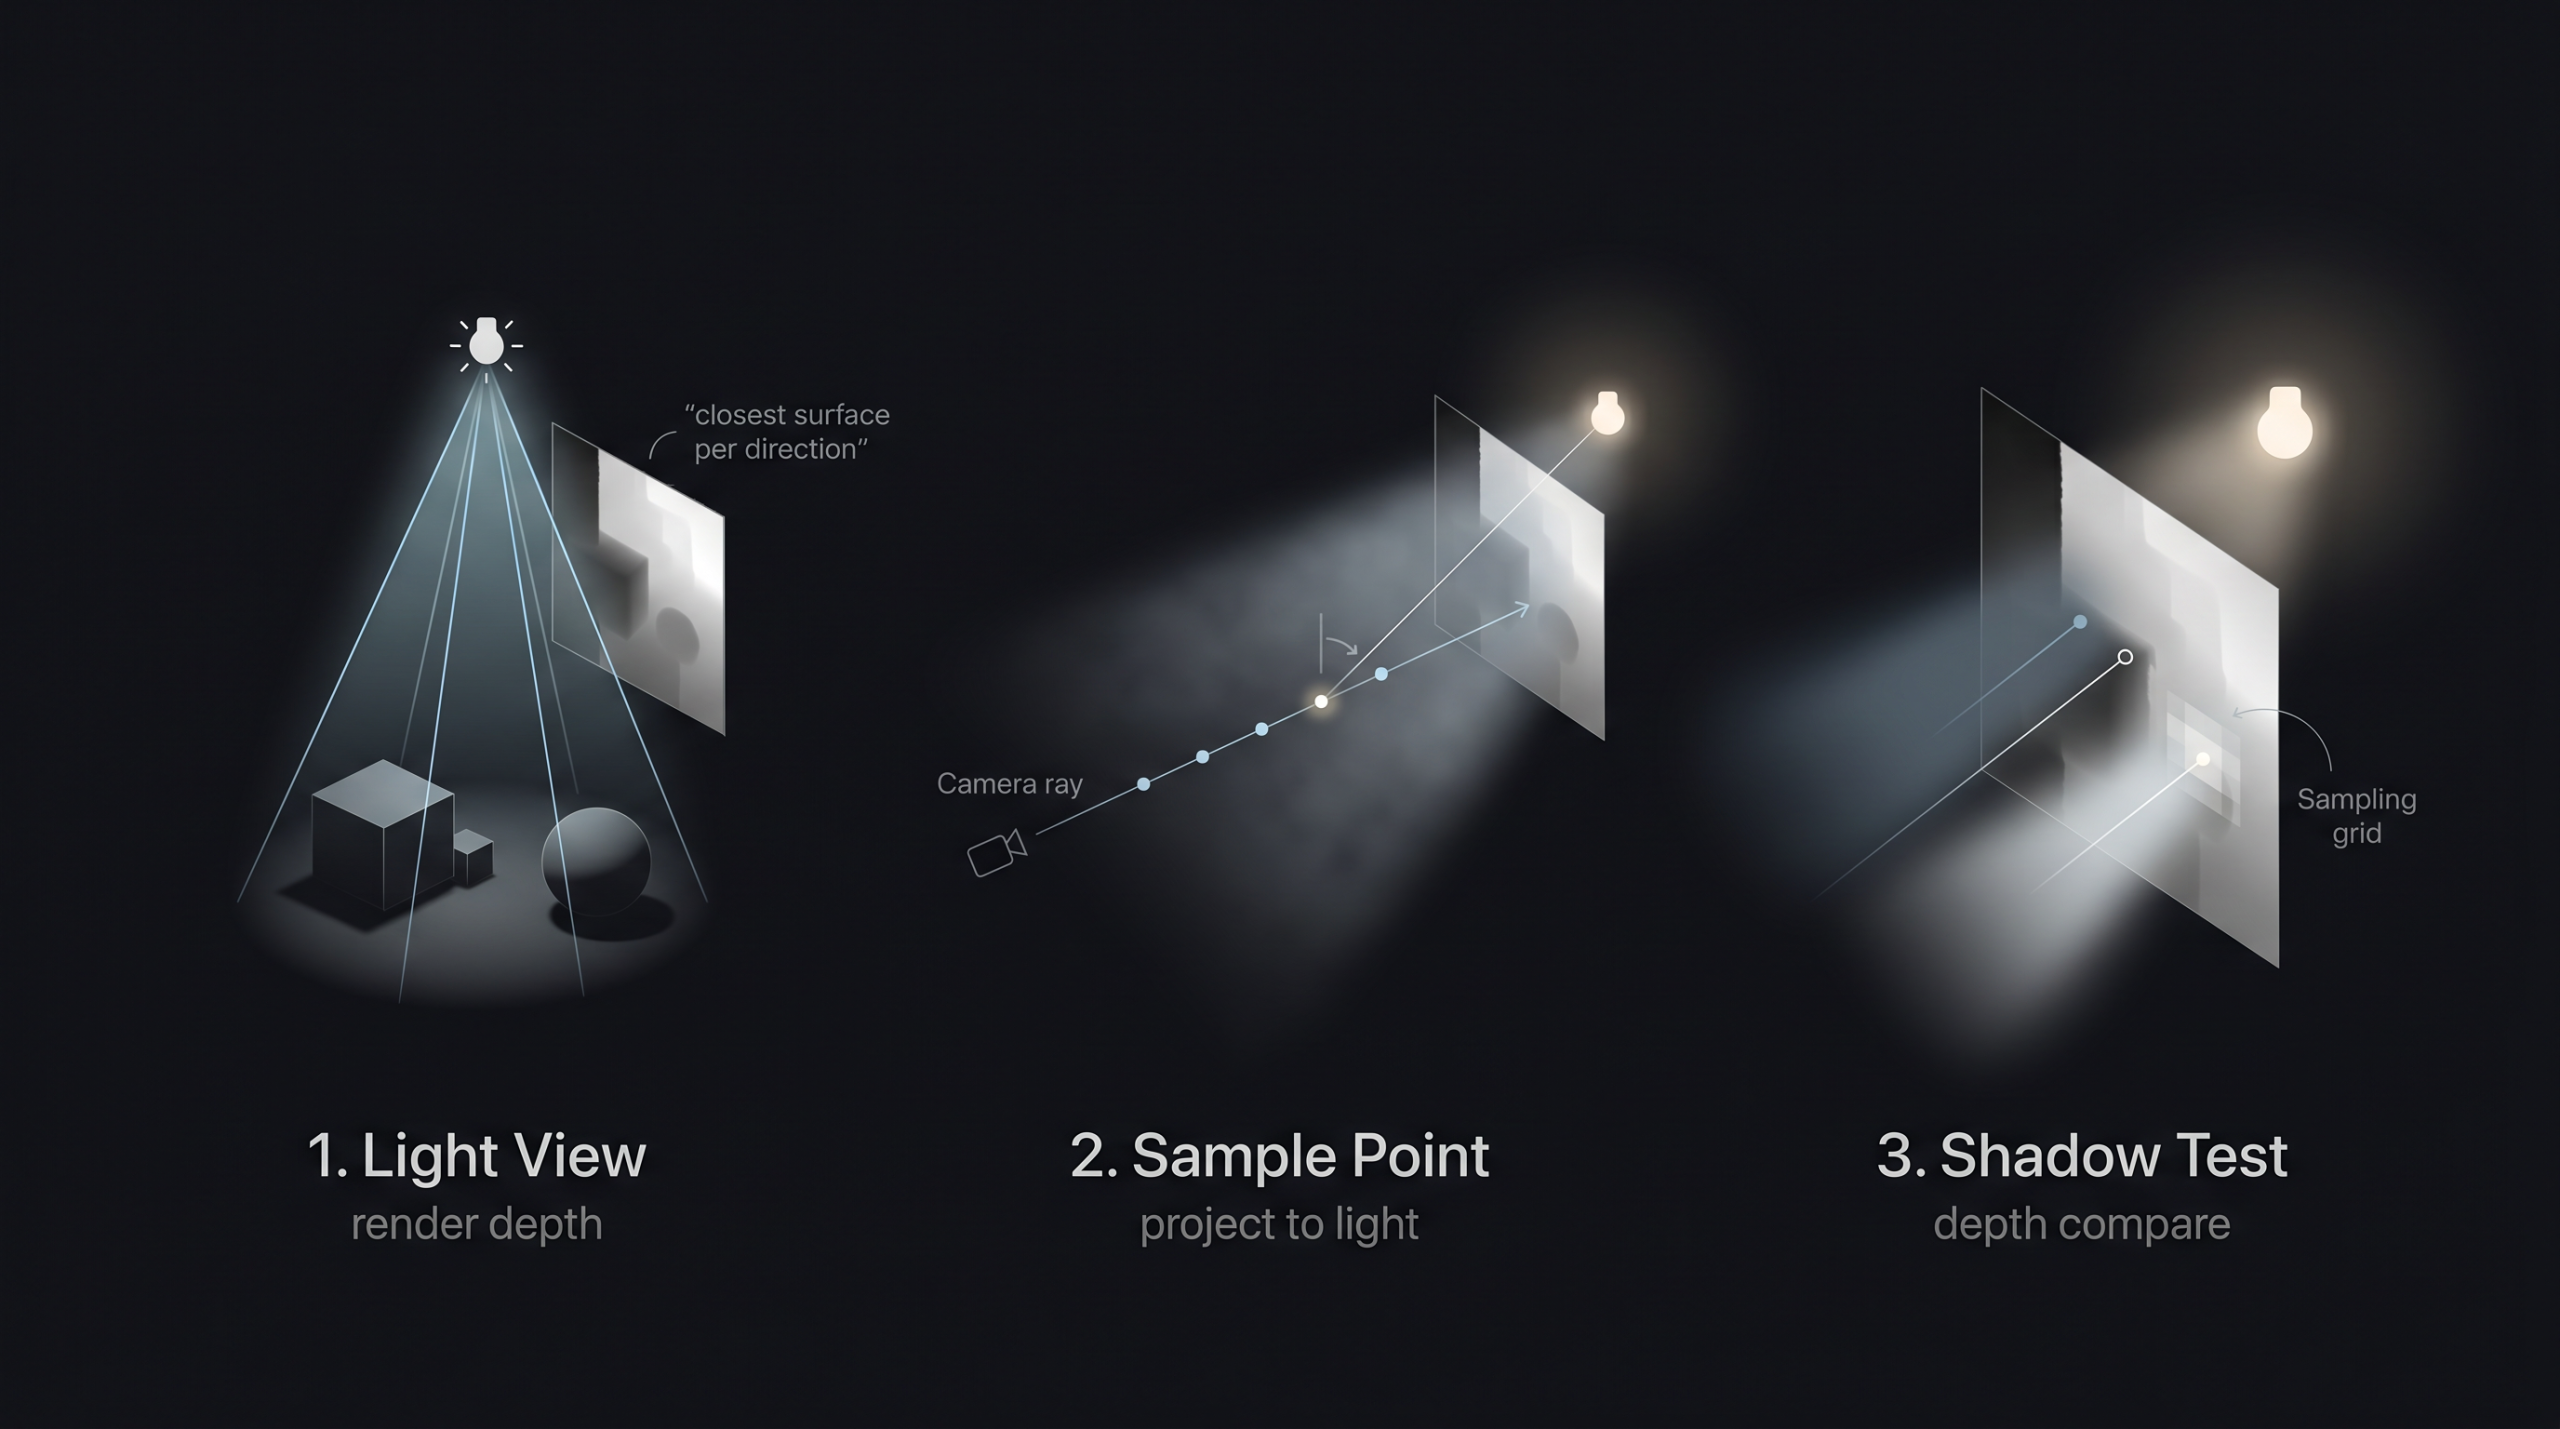
The idea is this. We pretend the light has its own camera, placed exactly at the light’s position and pointing in the same direction. We render the scene from the light’s point of view but instead of saving an RGB image, we save just the depth of every pixel. How far the closest piece of geometry is from the light, for every direction the light cares about.
That’s it. That’s your shadow map. A grayscale image where every pixel says “the closest blocker in this direction is at distance X”.
Now, when we’re walking along a camera ray and we want to know if a sample point is in shadow, we don’t trace anything. We just do this:
- Take the sample’s world position.
- Project it into the light camera’s view (a simple matrix multiplication).
- Look up the depth value at that pixel in the shadow map.
- Compare that depth to the sample’s distance from the light.
If the recorded depth is closer than my sample, something is blocking me I’m in shadow. If the recorded depth is farther, the light reaches me. One texture lookup per sample. Done.
This is the core technique that powers volumetric lighting in every modern game and almost every compositing volumetric tool, including aeVolumeRays. It works because we’re not doing optics we’re doing a clever cached lookup.
One small refinement: a single shadow lookup per sample produces hard, jagged shadow edges. To soften them, we sample the shadow map a few times in a small grid (called PCF Percentage-Closer Filtering) and average the results. This trades a little performance for much nicer-looking soft shadows. The pcf_radius knob in the gizmo controls exactly this.
Making It Look Real: The Refinements That Matter
The basic raymarch + shadow map combo gets you a recognisable god ray. But it looks like a god ray from 1998 uniform, plasticky, too clean. Real volumetric lighting needs a stack of refinements on top, and each one earns its place in the gizmo.
Volumetric Noise
Real air isn’t uniform. There are denser pockets of dust, swirls of smoke, gaps where the mist has thinned out. A perfectly uniform shaft looks like a translucent tube not like air.
aeVolumeRays adds 3D noise to the local density of the volume at each sample point. It evaluates a pseudo-random function in world space, uses the result to multiply the density up or down, and the shaft develops internal structure. It moves from “tube” to “atmosphere”.
The gizmo uses two layers of noise running together: a low-frequency layer that creates large structural variations (the “shape” of denser zones inside the shaft), and a high-frequency layer that adds fine-grained detail (the dust-particle level). They’re combined multiplicatively, so the high-frequency detail rides on top of the low-frequency structure instead of fighting it.
The offsets of both noise layers are exposed as parameters, so you can link them to frame with a small multiplier and animate the dust drifting through the air over time. It’s a small touch and it makes a huge difference for moving shots.
Holdouts From Beauty Depth
If a character walks in front of the light, the volumetric shaft should be cut off where it meets her body. Otherwise the shaft draws right over the top of her, which looks completely wrong.
The fix is to feed the depth pass of your beauty render into the gizmo. For every camera ray, we look up that depth at the corresponding pixel and clip the raymarch wherever the ray hits something solid. We never sample beyond opaque geometry, so the shaft stops cleanly at the first object it meets.
There’s also a holdout_softness parameter that adds a smooth fade right at the holdout edge, so the cut isn’t a hard line. It mimics the way real volumetrics seep slightly around the edges of objects.
Cookies and Coloured Gobos
A “cookie” (or gobo) is the patterned mask that movie projectors and theatre spotlights use to cast shapes onto walls leaf shadows, window frames, abstract patterns. The gizmo accepts an optional cookie input and projects it through the volume from the light camera’s perspective.
Better still: if your cookie has colour, the shaft can be tinted by it. Want to recreate the look of sunlight pouring through a stained-glass window into a cathedral? Plug a stained-glass image as the cookie, set cookie_color_strength to 1, and the shaft picks up the colours of the glass as it travels through the air.
Atmospheric Haze
Separate from any specific light, aeVolumeRays includes a global atmospheric haze layer. This is a simple additive fog that builds up with distance to the camera, and it’s what gives a scene its sense of depth.
You can use it on its own, even with no lights, just to add subtle atmospheric perspective to a render. Or you can stack it with the shafts to get a coherent atmosphere where everything feels like it’s sharing the same air.
Soft Area Lights (Cheap Cheat)
Real light sources aren’t infinitely small points. A window is a rectangle. A practical bulb is a sphere. A panel is a square. These produce softer shadows and wider, blurrier shafts than a true point light.
Properly simulating area lights in a raymarcher is expensive you’d need to sample multiple positions on the light’s surface per sample point. Instead, the gizmo includes a cheap fake: an area_light_size parameter that uniformly widens the cone fade. It’s not physically accurate, but visually it sells the look of a larger light source for almost no cost.
The Anatomy of aeVolumeRays
The gizmo is a single Nuke node with five inputs. The setup looks like this:
- cam_render your render camera. The same one used to render the beauty pass. The gizmo uses this to construct the rays for every pixel.
- cam_light a camera placed and oriented exactly where your light source is. This camera defines the light’s position, direction, FOV, and clipping range. Think of it as the spotlight made physical.
- sr_beauty the depth channel from your beauty render. This is what enables holdouts. Without it, the shafts will draw right over the top of your characters and props.
- sr_shadow a depth pass rendered from the light camera’s point of view. This is the actual shadow map. Generate it with a ScanlineRender (or your 3D package’s depth output) using the light camera.
- cookie (optional) a 2D image to project as a gobo. Black and white for shape masks, full RGBA for coloured tinting.
The properties panel is divided into clear sections Look, Quality, Shadow, Cone & Shaft, Scattering, Cookie, Holdout, Volumetric Noise, Atmospheric Haze. Every knob has a tooltip explaining what it does, and the defaults are tuned to give you a believable shaft within seconds of plugging things in.
What You Can Actually Do With It
Anywhere there’s a directional or spot light and you want the air to feel alive, aeVolumeRays earns its keep. Some of the things I’ve used it for:
- Architecture and product shots soften interior renders with believable beams from windows or skylights. Add a touch of haze and the whole space breathes.
- Live action integration sell CG elements into real footage by matching the volumetric quality of the plate’s atmosphere. If your plate has subtle god rays from a window, add matching shafts to the CG side.
- Mood lighting turn a flat 3D render into a cinematic frame in two minutes by adding shafts and atmospheric haze. It’s one of the highest impact-per-effort comp tricks you can learn.
- Creature features that classic horror beat where the monster steps through a beam of light. With holdouts on, you can dial in exactly how the shaft cuts off as the creature moves through it.
- Stage and concert shots coloured spotlights cutting through smoke, with cookies for shape variation and animated noise for swirling haze.
- Forest, dust, fog anywhere the air should feel like a character in the shot.
It’s a comp tool, so it lives downstream of your render. You can iterate without re-rendering change colours, animate density, swap cookies, tweak the scattering, all in real time on the GPU.
Free for Everyone
I built this for the community. aeVolumeRays is free. You can download the gizmo from my GitHub repository, use it in personal or commercial projects, modify it, and study how it works. If you find bugs, open an issue. If you build something cool with it, I’d love to see it.
The repo includes the gizmo, the BlinkScript source code (fully commented), example Nuke scripts, and a quick-start guide. I’ll also be uploading short demo videos showing common setups: church windows, forest sun shafts, spaceship cockpit lighting, headlights through fog, stage spotlights. If you get stuck on a specific look, those should cover most cases.
One Last Thing
The more I worked on this gizmo, the more amazed I got at how much physics we can fake convincingly with a few hundred lines of code and a depth texture. Light scattering is the kind of phenomenon that took physicists centuries to describe properly, and we routinely fudge it in real-time using tricks that would make a 1900s physicist faint. And yet it works. The eye is forgiving, the math is friendly, and the result is beautiful.
If you’ve never opened BlinkScript, it’s worth a few hours of your time. It’s the closest thing Nuke has to writing your own renderer, and the leap from “I’m a comp artist” to “I wrote the algorithm that draws this” is genuinely empowering. There’s a small but lovely community of people pushing the limits of what BlinkScript can do, and I hope this post nudges a few more in that direction.
Thanks for reading. Now go light up some air.